
Introduction
This document describes the requirements and steps for setting up the Hirsch Velocity integration with the AIS agent.
Prerequisites
Required Software
-
Hirsch Velocity (Identiv) - on-premises access control platform installed on a Windows server.
-
Velocity SDK add-on - required for REST API connectivity used by the agent. Provided as a separate installation package by Identiv.
-
Microsoft IIS - required to host the Velocity SDK REST API on the Velocity server (configured by the Velocity SDK installer).
-
Microsoft SQL Server (instance
IDENTIV) - Velocity database engine; SQL Server Authentication (Mixed Mode) must be enabled. See PACS Configuration → Enabling SQL Server Mixed Mode Authentication. -
For supported PACS version, please see the HID Knowledge Base compatibility matrix: https://hidis.atlassian.net/wiki/x/DIAa.
Required Licenses
The agent requires the Velocity SDK add-on license, in addition to a base Velocity license (Express or Server edition). The SDK add-on provides the REST API used by the agent.
-
To obtain a Velocity SDK license, contact your certified Identiv dealer or send an email to
sales@identiv.com. -
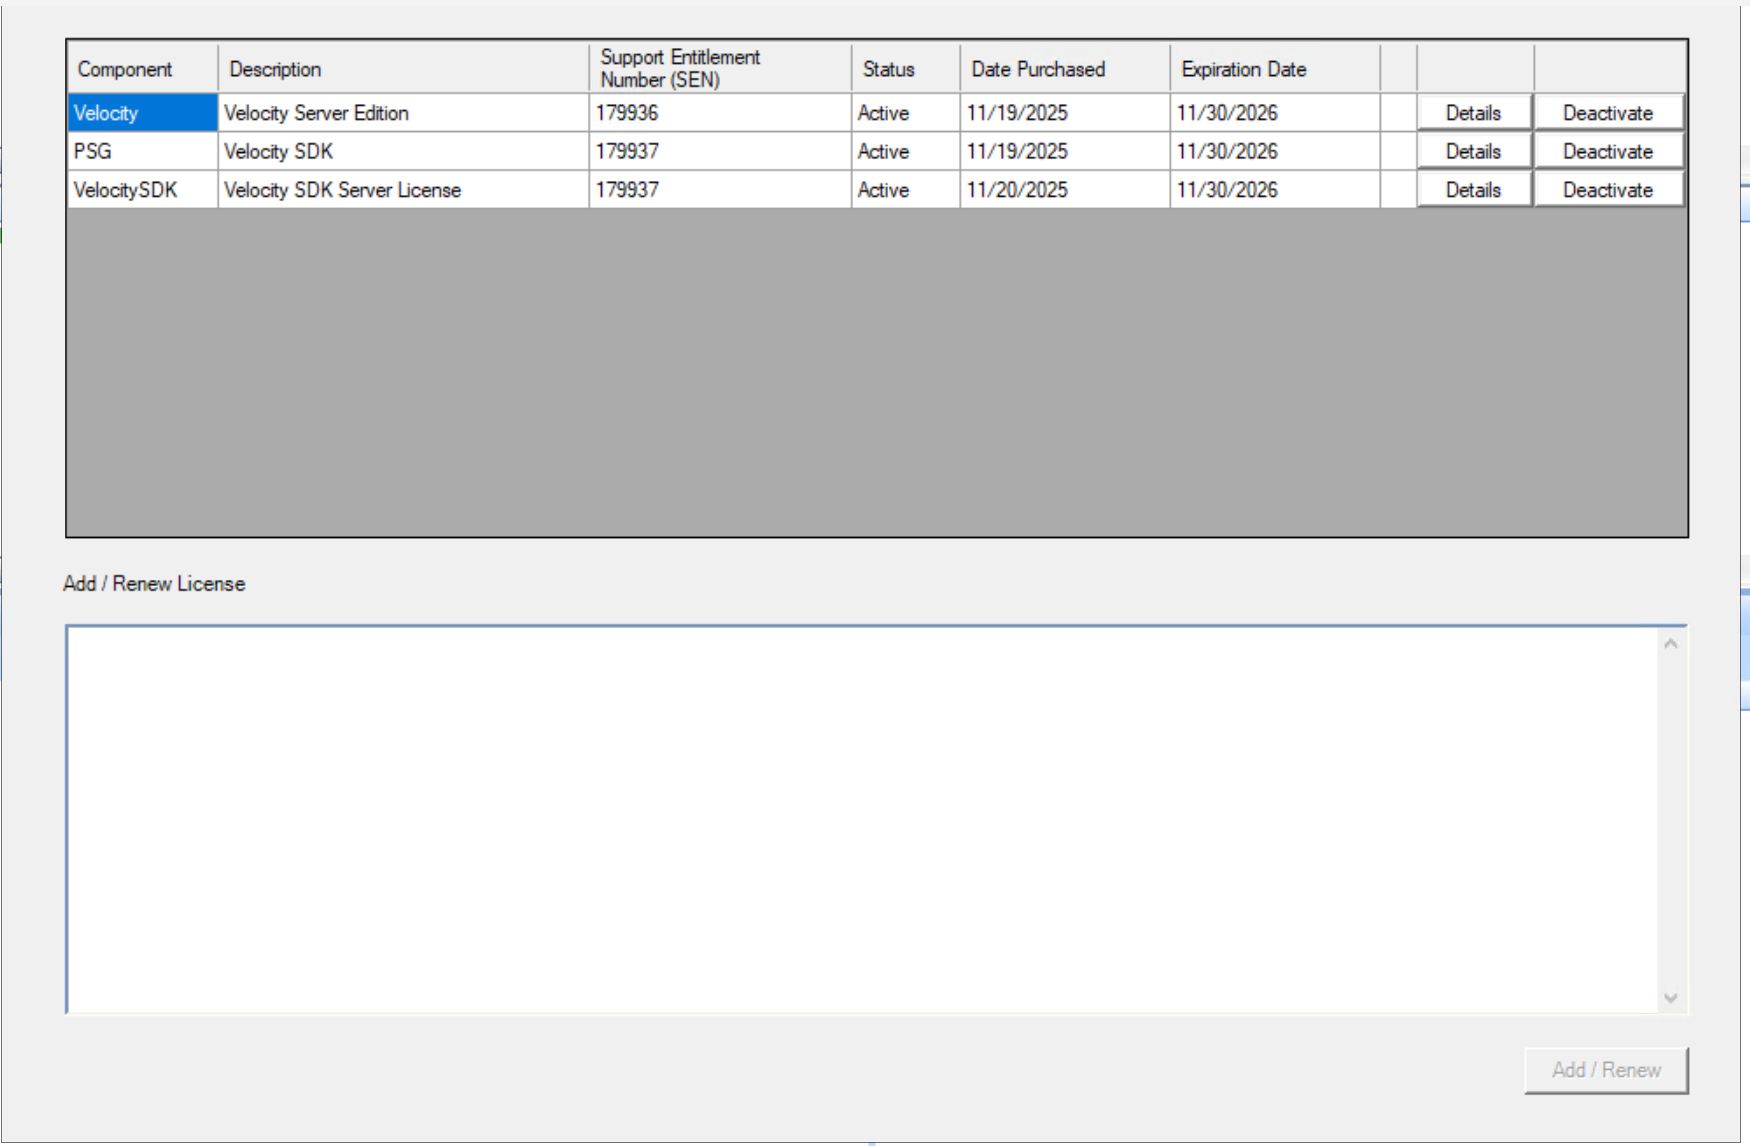
Existing licenses can be verified in the Velocity License Manager: in the Windows taskbar tray on the Velocity server, right-click the Velocity Service Control Manager (SCM) icon and select Velocity License Manager. Both PSG (Description: Velocity SDK) and VelocitySDK (Description: Velocity SDK Server License) Components must be listed and Active.
Required Permissions for Technical User
The agent connects to Velocity using two separate accounts:
-
Velocity Operator - used for REST API authentication (configured in the agent as
VelocityOptions.Username/VelocityOptions.Password). -
SQL Server login - used for direct database access (configured in the agent as
VelocityOptions.ConnectionString).
Velocity Operator
When Velocity is configured to authenticate using Local machine accounts (the default for installations not joined to Active Directory), Velocity Operators are bound to existing Windows local user accounts on the Velocity server.
For the agent, a dedicated Windows local user (for example, agent_user) should be created and added as a Velocity Operator with a role granting at minimum:
|
Velocity component |
Required permissions |
|---|---|
|
Enrollment Manager |
Use, Change User Defined Fields, Credentials - Force Download |
|
Enrollment - Person |
Add, Delete, Save, View |
|
Enrollment - Credential |
Add, Delete, Save, View |
|
Door Groups |
View |
|
Credential Template |
View |
The default Velocity Administrators role grants all of the above and may be used for simplicity.
It is recommended to use a separate account for the agent rather than reusing an administrator's personal account.
A step-by-step procedure for creating the technical user is provided in PACS Configuration → Creating the Technical User.
SQL Server Login
The agent uses a SQL Server login to connect to the Velocity database. The built-in sa login is recommended (see PACS Configuration → Enabling SQL Server Mixed Mode Authentication).
Velocity manages its own SQL logins through its internal SQL DB Manager. Do not create custom SQL Server logins via Velocity's SQL DB Manager - modifying or deleting the default login settings will almost certainly result in program malfunction or failure. Using the built-in sa login is safe because Velocity does not modify it.
Configuration
PACS Configuration
Enabling SQL Server Mixed Mode Authentication
By default, Velocity's SQL Server instance is configured for Windows Authentication only. The agent connects via SQL Server Authentication, so Mixed Mode must be enabled once on the Velocity server.
Perform these steps on the Velocity server, logged in as a Windows administrator.
Open SQL Server Management Studio (SSMS) and connect via Windows Authentication
-
Server name:
<server>\IDENTIV(for example,WIN-A274BSKGD6M\IDENTIV). -
Authentication: Windows Authentication.
-
Click Connect.
Switch the server to Mixed Mode
-
In Object Explorer, right-click the connected server name and choose Properties.
-
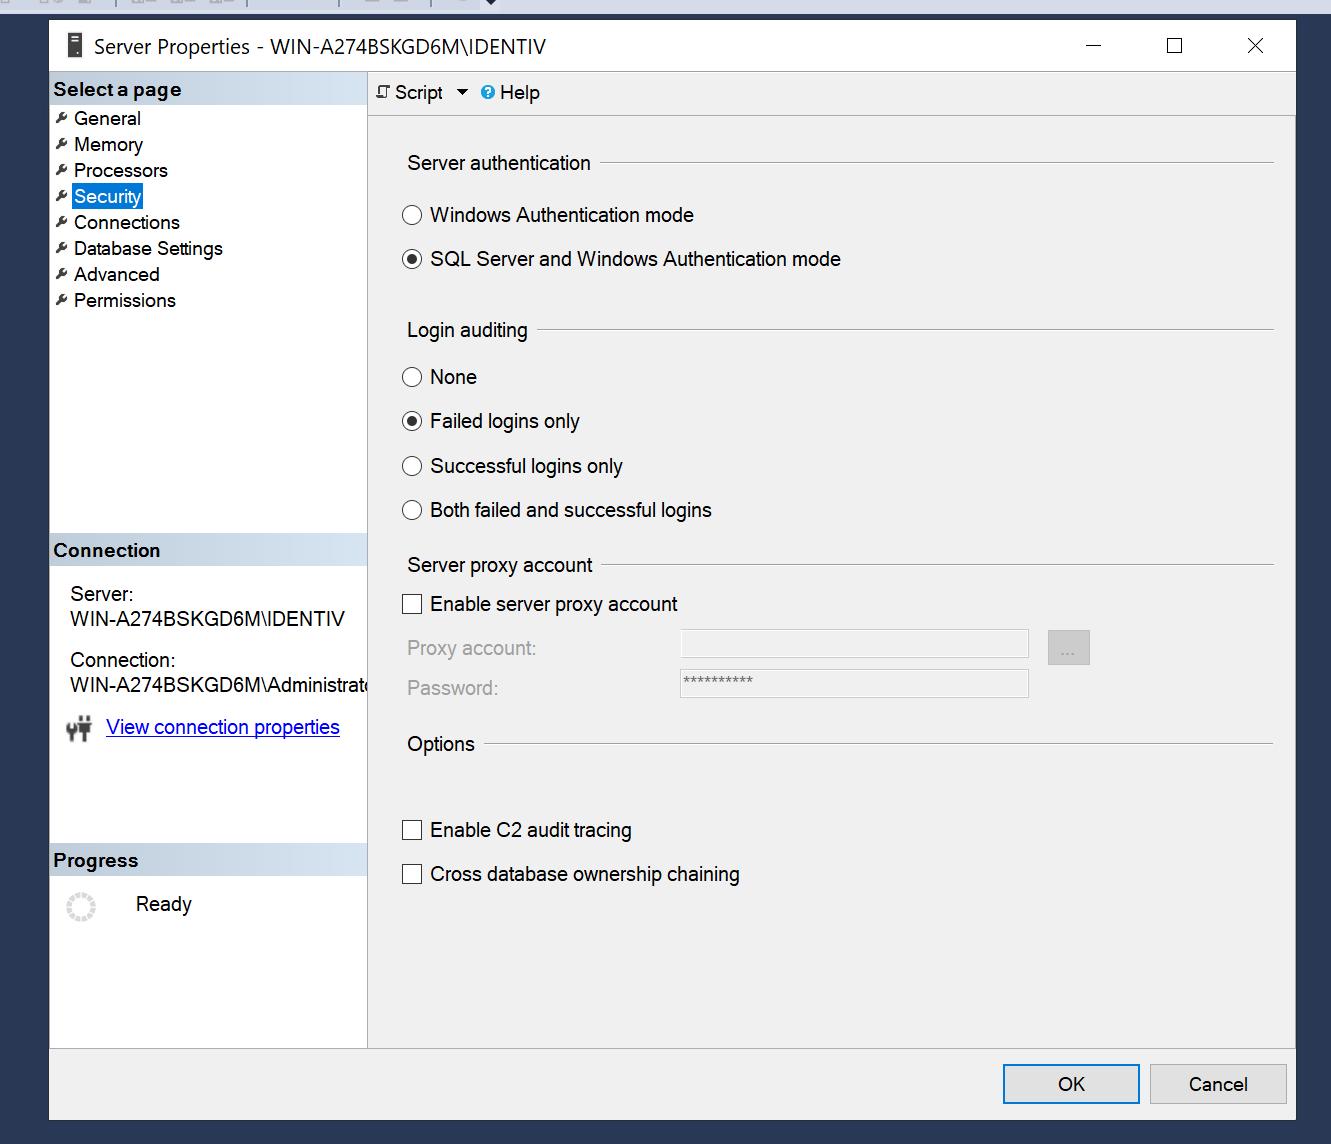
On the Security page, under Server authentication, select SQL Server and Windows Authentication mode.
-
Click OK. A dialog will note that the change requires a service restart.
Restart the SQL Server service
-
Open Services (Win+R →
services.msc). -
Locate SQL Server (IDENTIV).
-
Right-click and select Restart. Wait for the service to start completely.
Enable the sa login and set its password
In SSMS:
-
Expand Security → Logins.
-
Right-click sa and choose Properties.
-
On the General page, set a strong password and confirm it.
-
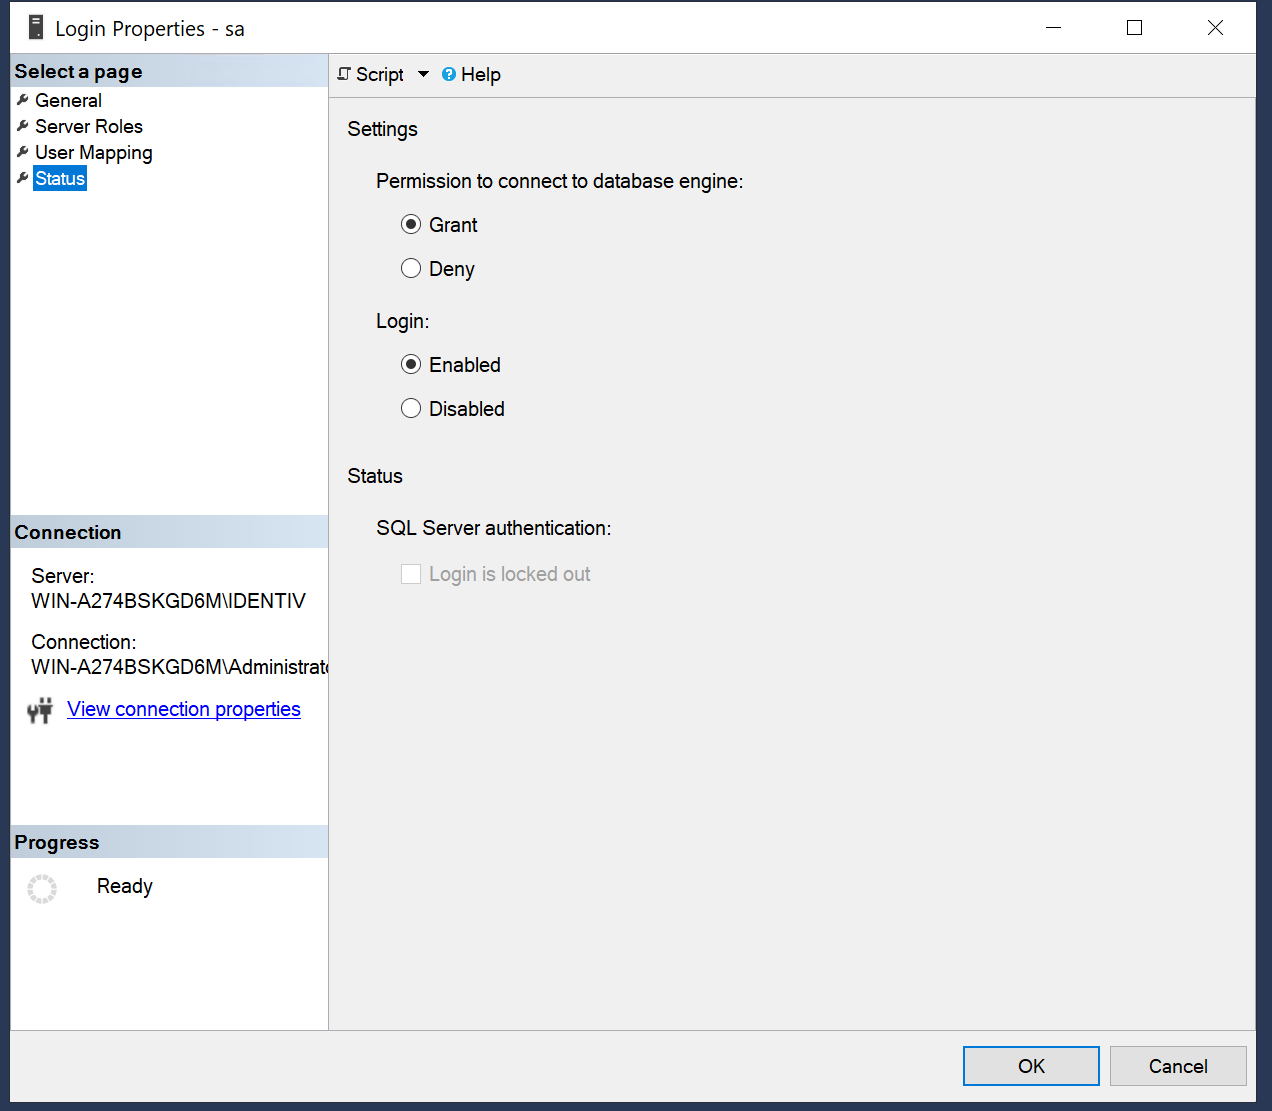
On the Status page, set Login to Enabled.
-
Click OK.
Alternatively, the same change can be applied with a T-SQL command:
ALTER LOGIN sa ENABLE;
ALTER LOGIN sa WITH PASSWORD = '<sa-password>';
Verify SQL connectivity from the agent host
From the machine where the agent will run, open a command prompt and execute:
sqlcmd -S <server>\IDENTIV -U sa -P <sa-password> -Q "SELECT @@VERSION"
A successful response containing the SQL Server version confirms that SQL Server Authentication is working and the agent can connect.
Velocity manages its own SQL logins through its internal SQL DB Manager. Do not create custom SQL Server logins via Velocity's SQL DB Manager - modifying or deleting the default login settings will almost certainly result in program malfunction or failure. Using the built-in sa login is safe because Velocity does not modify it.
Creating the Technical User
The agent uses a dedicated Velocity Operator to authenticate against the Velocity REST API. Velocity Operators are bound to Windows local user accounts; the Velocity desktop client can create the Windows user directly from the Operator Properties dialog, so a separate trip to Windows Computer Management is not required.
Phase 1: Create the Velocity Operator (and the Windows local user)
In the Velocity desktop client, logged in as an existing administrator Operator:
-
In the System Tree pane, expand Velocity Configuration and select the Operators folder.
-
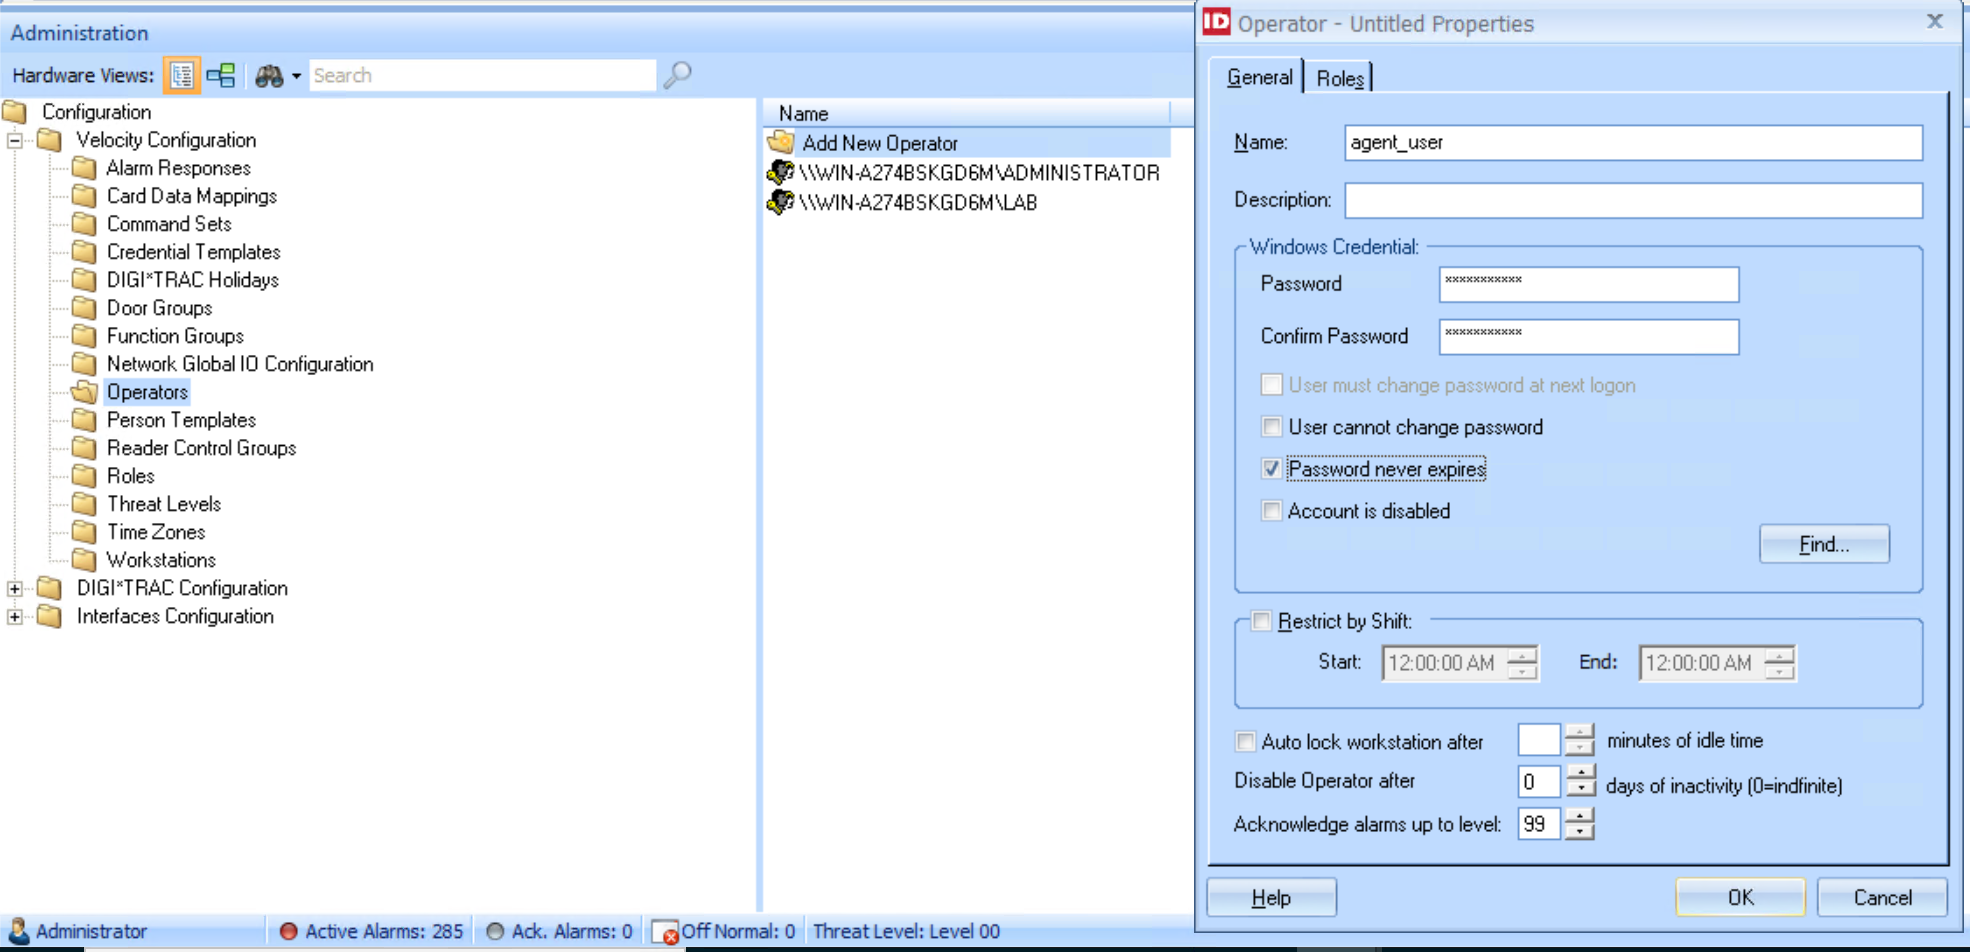
In the Components pane, double-click Add New Operator. The Operator - Untitled Properties dialog opens on the General tab.
-
Fill out the dialog:
-
Name:
agent_user(or another name of your choice). This is also the Windows local user name. -
Description: for example, "Velocity Operator for HID PACS Agent" (optional).
-
Windows Credential → Password / Confirm Password: a strong password.
-
Uncheck User must change password at next logon (the agent uses fixed credentials).
-
Check Password never expires if available.
-
Leave Account is disabled unchecked.
-
-
Velocity will create the matching Windows local user automatically when the dialog is saved.
Alternative - reuse an existing Windows user: click the Find... button in the Windows Credential section and select an existing Windows local account. Velocity will then bind the Operator to that account and use its current password.
Phase 2: Assign a role
-
Still in the Operator Properties dialog, click the Roles tab.
-
In the Not a Member of... pane, select the role to assign and click Add. The default Administrators role grants all permissions required by the agent and is the simplest choice; alternatively, a custom role limited to the permissions listed in Required Permissions for Technical User may be created beforehand (see Phase 3) and assigned here.
-
Click OK to save.
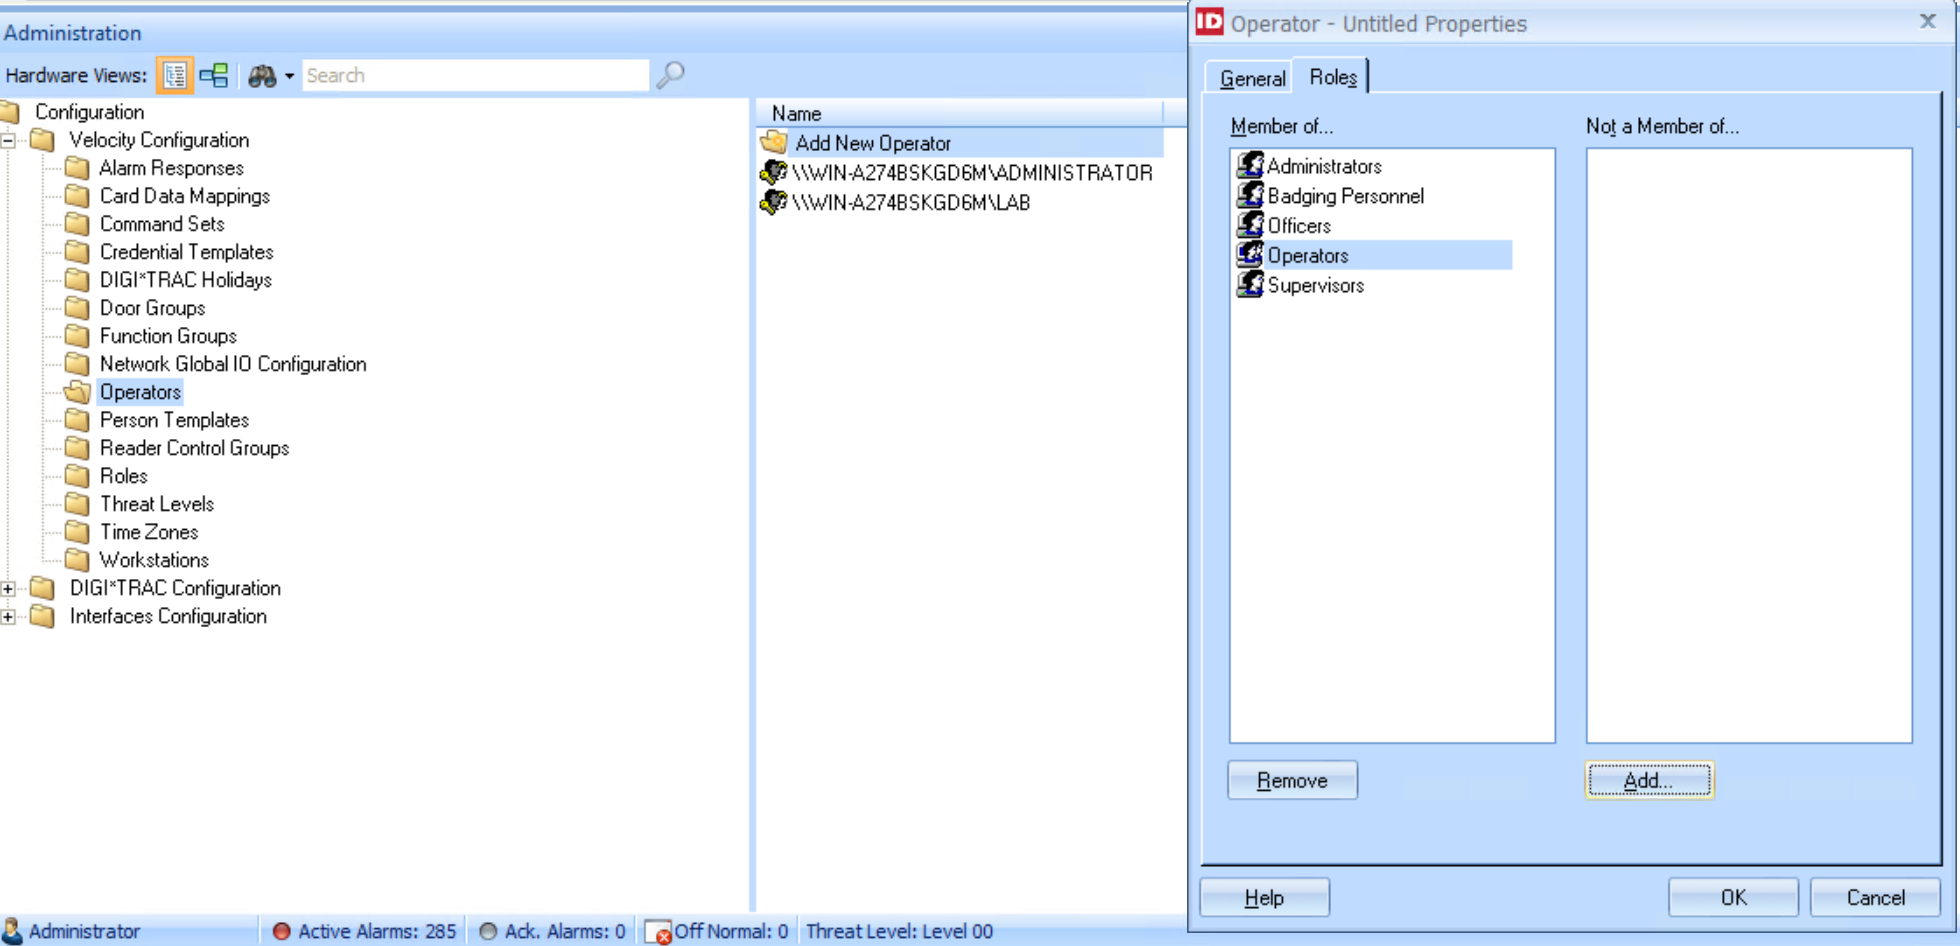
The new operator appears in the Components pane under Operators in the format \\<machine-name>\<username>.
Phase 3 (optional): Create a custom role with limited permissions
If a more restrictive role is preferred over Administrators, define the custom role before assigning it to the operator:
-
In the System Tree pane, select the Roles folder under Velocity Configuration.
-
In the Components pane, double-click Add New Role.
-
On the Application Permissions page, check the permissions listed in Required Permissions for Technical User.
-
Save the role.
-
Return to the operator created in Phase 1 and assign this custom role on the Roles tab.
Velocity UI Setup
The agent requires several Velocity entities to be configured before first use. Perform these steps in the Velocity desktop client.
User Defined Fields (UDFs)
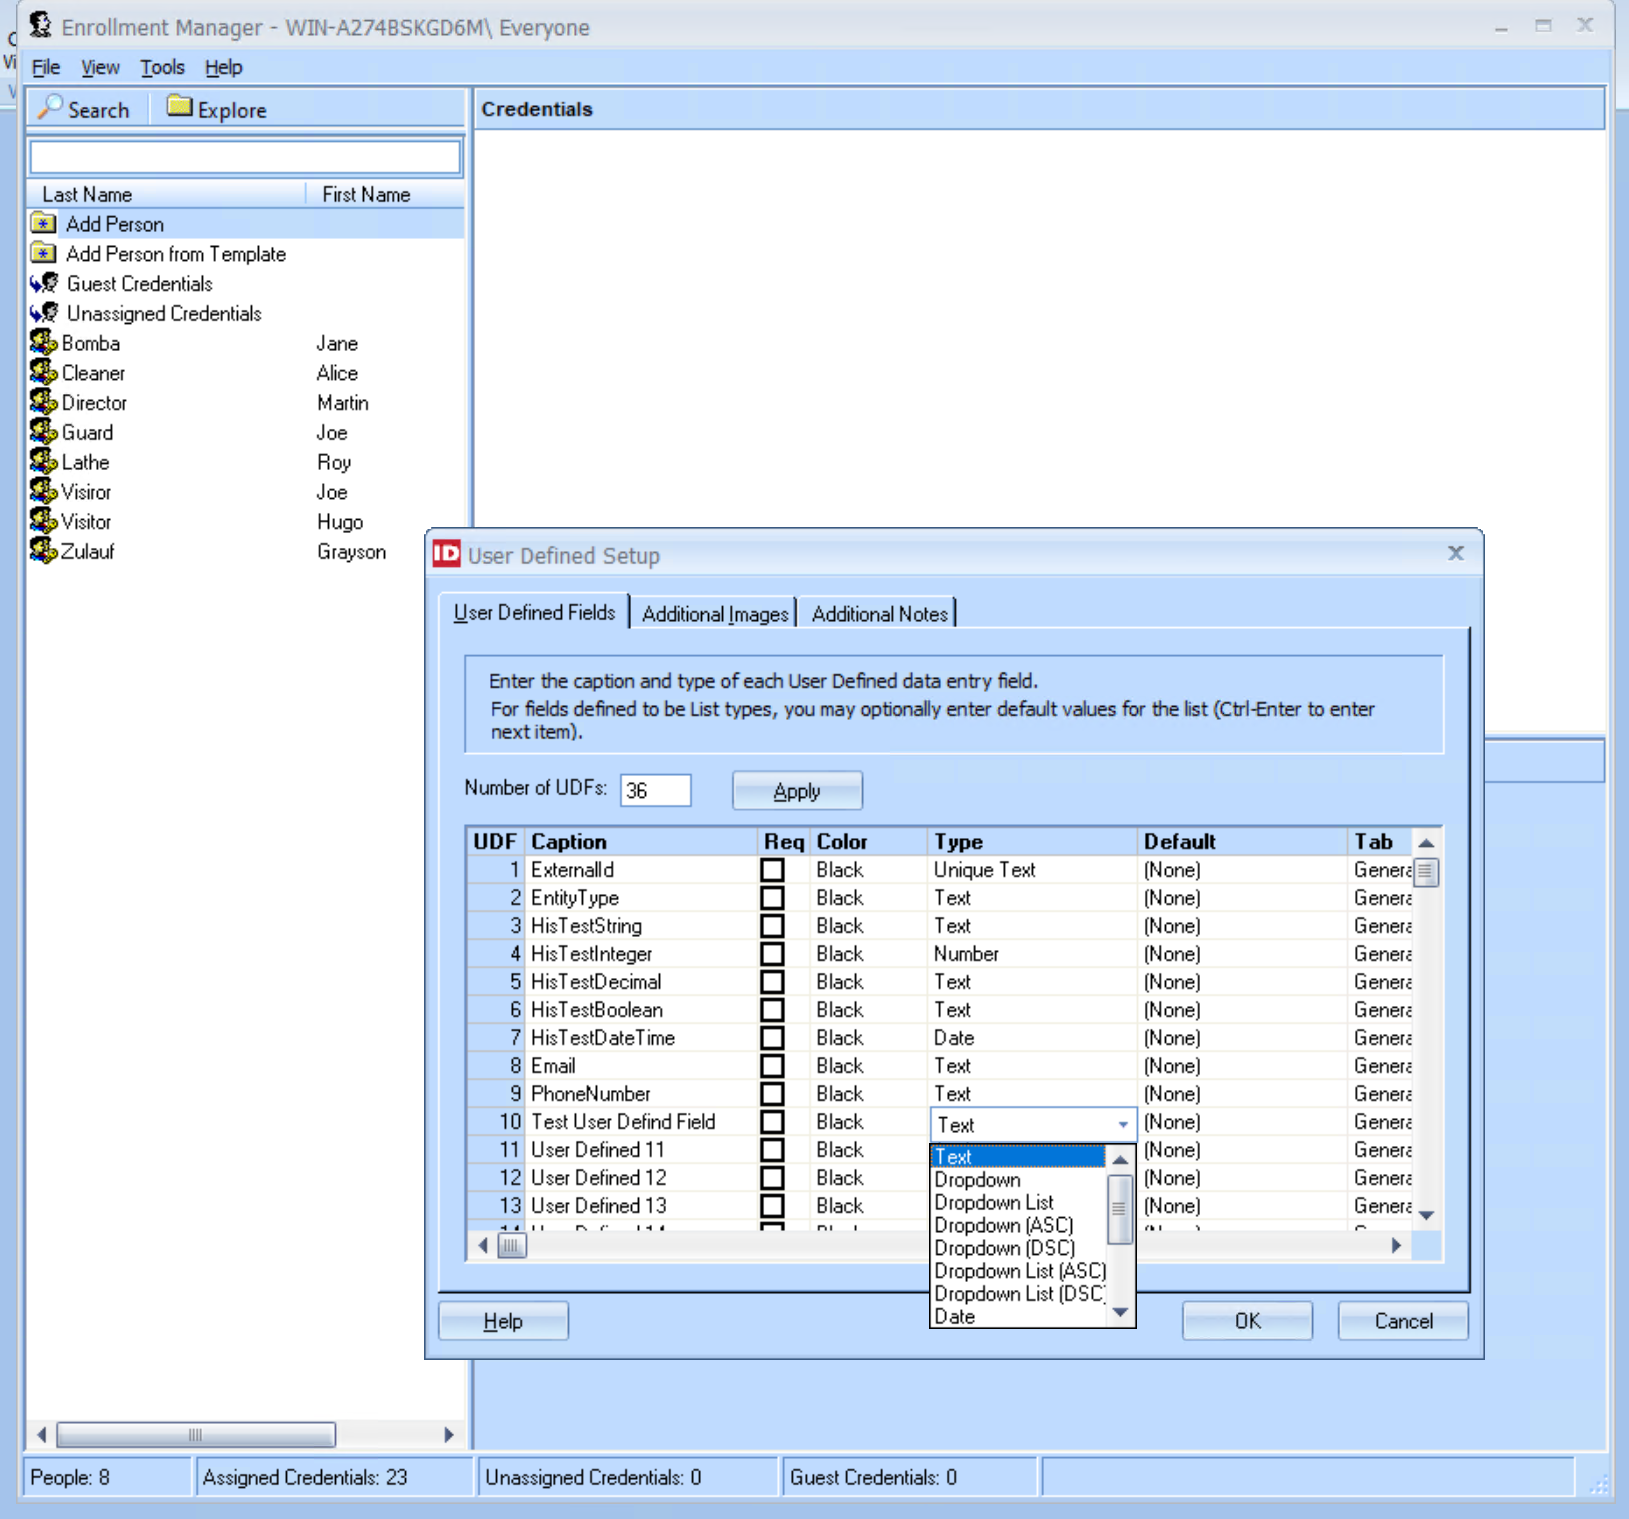
Two UDFs are required by the agent for identity tracking; additional UDFs may be created for custom Extension Field mapping. See also Creation of Extension Fields.
-
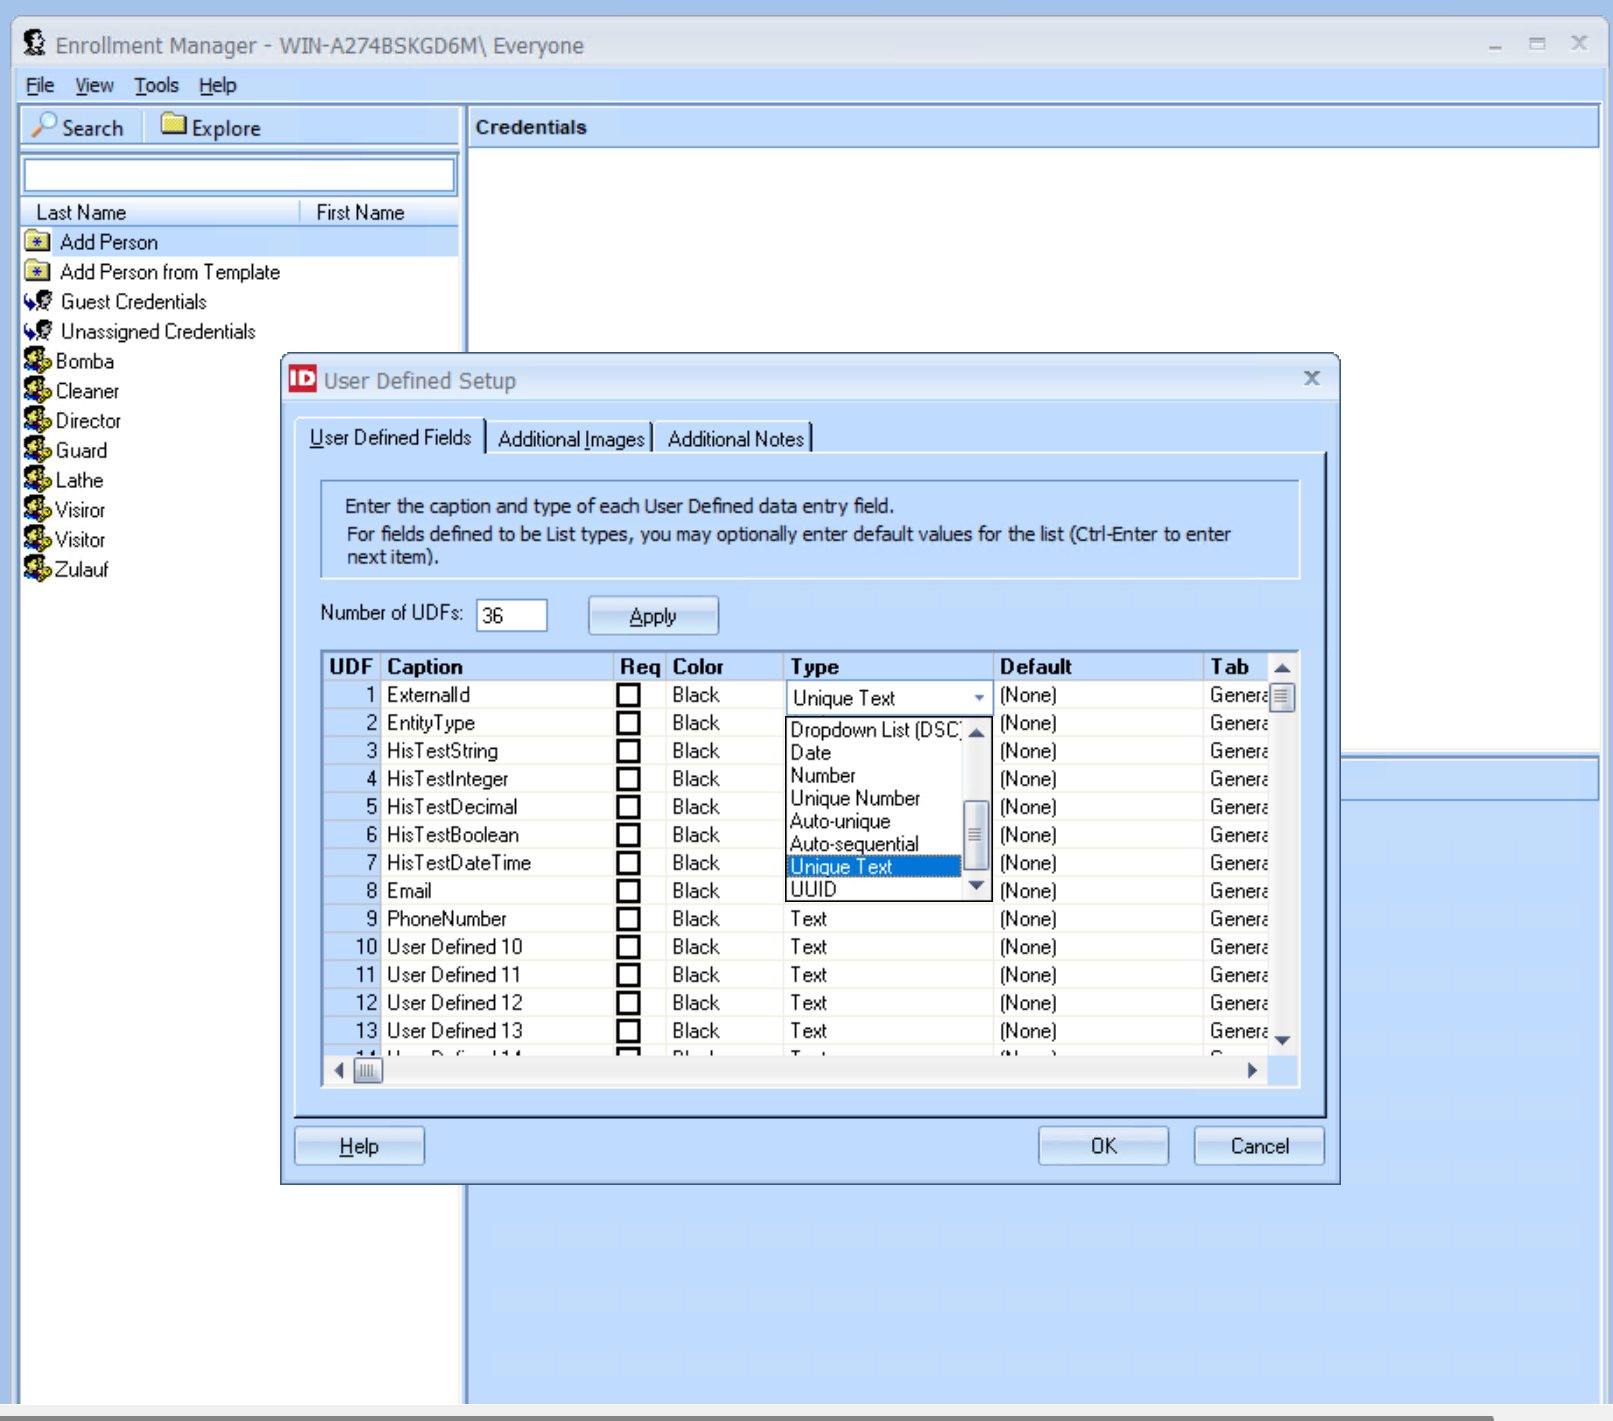
In the Velocity desktop client, open the Enrollment Manager, then in its menu choose Tools → User Defined Fields.
-
Define the following fields:
|
UDF role |
Suggested Caption |
Velocity Type |
Required |
|---|---|---|---|
|
External Id |
|
Unique Text (type 12) |
Yes |
|
Entity Type |
|
Text (type 1) |
Yes |
|
|
|
Text (type 1) |
Optional |
|
Phone Number |
|
Text (type 1) |
Optional |
|
Custom Extension Fields |
(any) |
Text / Number / Date |
Optional |
The ExternalId field must be of the Unique Text type so that Velocity enforces uniqueness across the system; this is required for idempotent identity creation by the agent.
Note the numeric UDF id assigned by Velocity to each field - these ids are entered into the agent's configuration (see Agent Configuration).
UDF values are limited to 50 characters by Velocity.
Velocity defines 36 UDF slots by default. The maximum number of UDFs is configurable via the Number of UDFs field at the top of the User Defined Setup dialog (up to 999). If more than 36 fields are required, increase this value and click Apply.
Credential Templates
|
Template purpose |
IDF |
Required |
Cfg parameter |
|---|---|---|---|
|
Default Card template |
2 (Card Only) |
Yes |
|
|
Technical Badge |
0 (Badge Only) |
Yes - used by the agent for per-identity access unit tracking |
|
|
PIN |
1 (Keypad Only) |
Only when experimental PIN write is enabled |
|
The agent only creates Card credentials from IDF = 2 (Card Only) templates. Templates with other IDF types (3 to 7) require a PIN at creation time, which the AIS CreateCredential request does not provide. PIN credentials (IDF = 1) are managed separately through the PIN handlers.
Important: Velocity's "Default Template" provided out of the box may have IDF = 1 (Keypad). The administrator must therefore either create a new IDF = 2 template (e.g., named "Standard Card") or change the default Card template's IDF to 2. The agent uses a single Card template (DefaultTemplateId) for all card credential creation; the actual card format is selected per credential and sent in the request, independent of the template's default format.
-
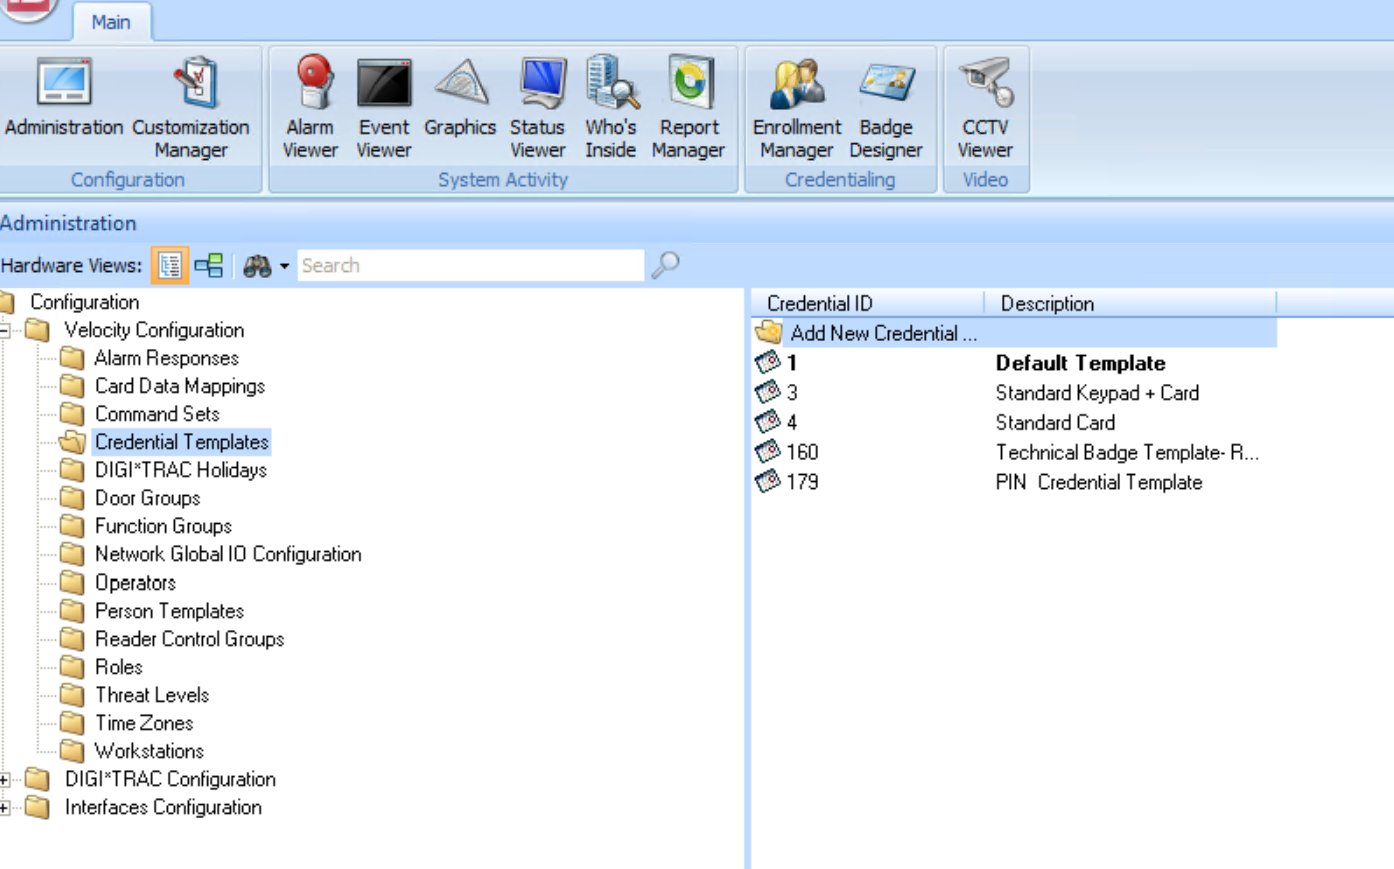
In the Velocity desktop client, click Administration in the ribbon, then in the System Tree expand Velocity Configuration and select the Credential Templates folder. The right-hand pane lists the existing templates with their numeric Credential ID (TemplateID) and Description.
-
Create or identify the required templates above. To add a new template, double-click Add New Credential... in the right pane.
-
For each template, note the numeric Credential ID assigned by Velocity - these are entered into the agent's configuration as shown in the table.
-
For the PIN template, set Code Length to the required PIN length (typically 4 to 6 digits). The agent's
PinLengthconfiguration must match this Code Length.
The list of card formats exposed to AIS (Std 26-Bit Wiegand, Passthru, etc.) is configured separately in Velocity__CardFormats - one entry per supported format with its HostCardType and CardId/FacilityId constraints. AIS displays these to the user when creating a credential and sends the chosen format back to the agent.
Door Groups
-
In the Velocity menu, choose Access → Door Groups.
-
Define the Door Groups required for the deployment, assigning the appropriate readers and time zones to each.
Configuration of the underlying physical hardware (controllers, doors, readers, time zones) is outside the scope of this document; refer to the Velocity Installation and Configuration guide.
Enable Multi Access Zones
By default, Velocity allows a single Door Group per credential per controller. Because the agent assigns multiple Door Groups to the technical badge credential, this restriction must be relaxed.
-
Open the Velocity desktop client (not the web client).
-
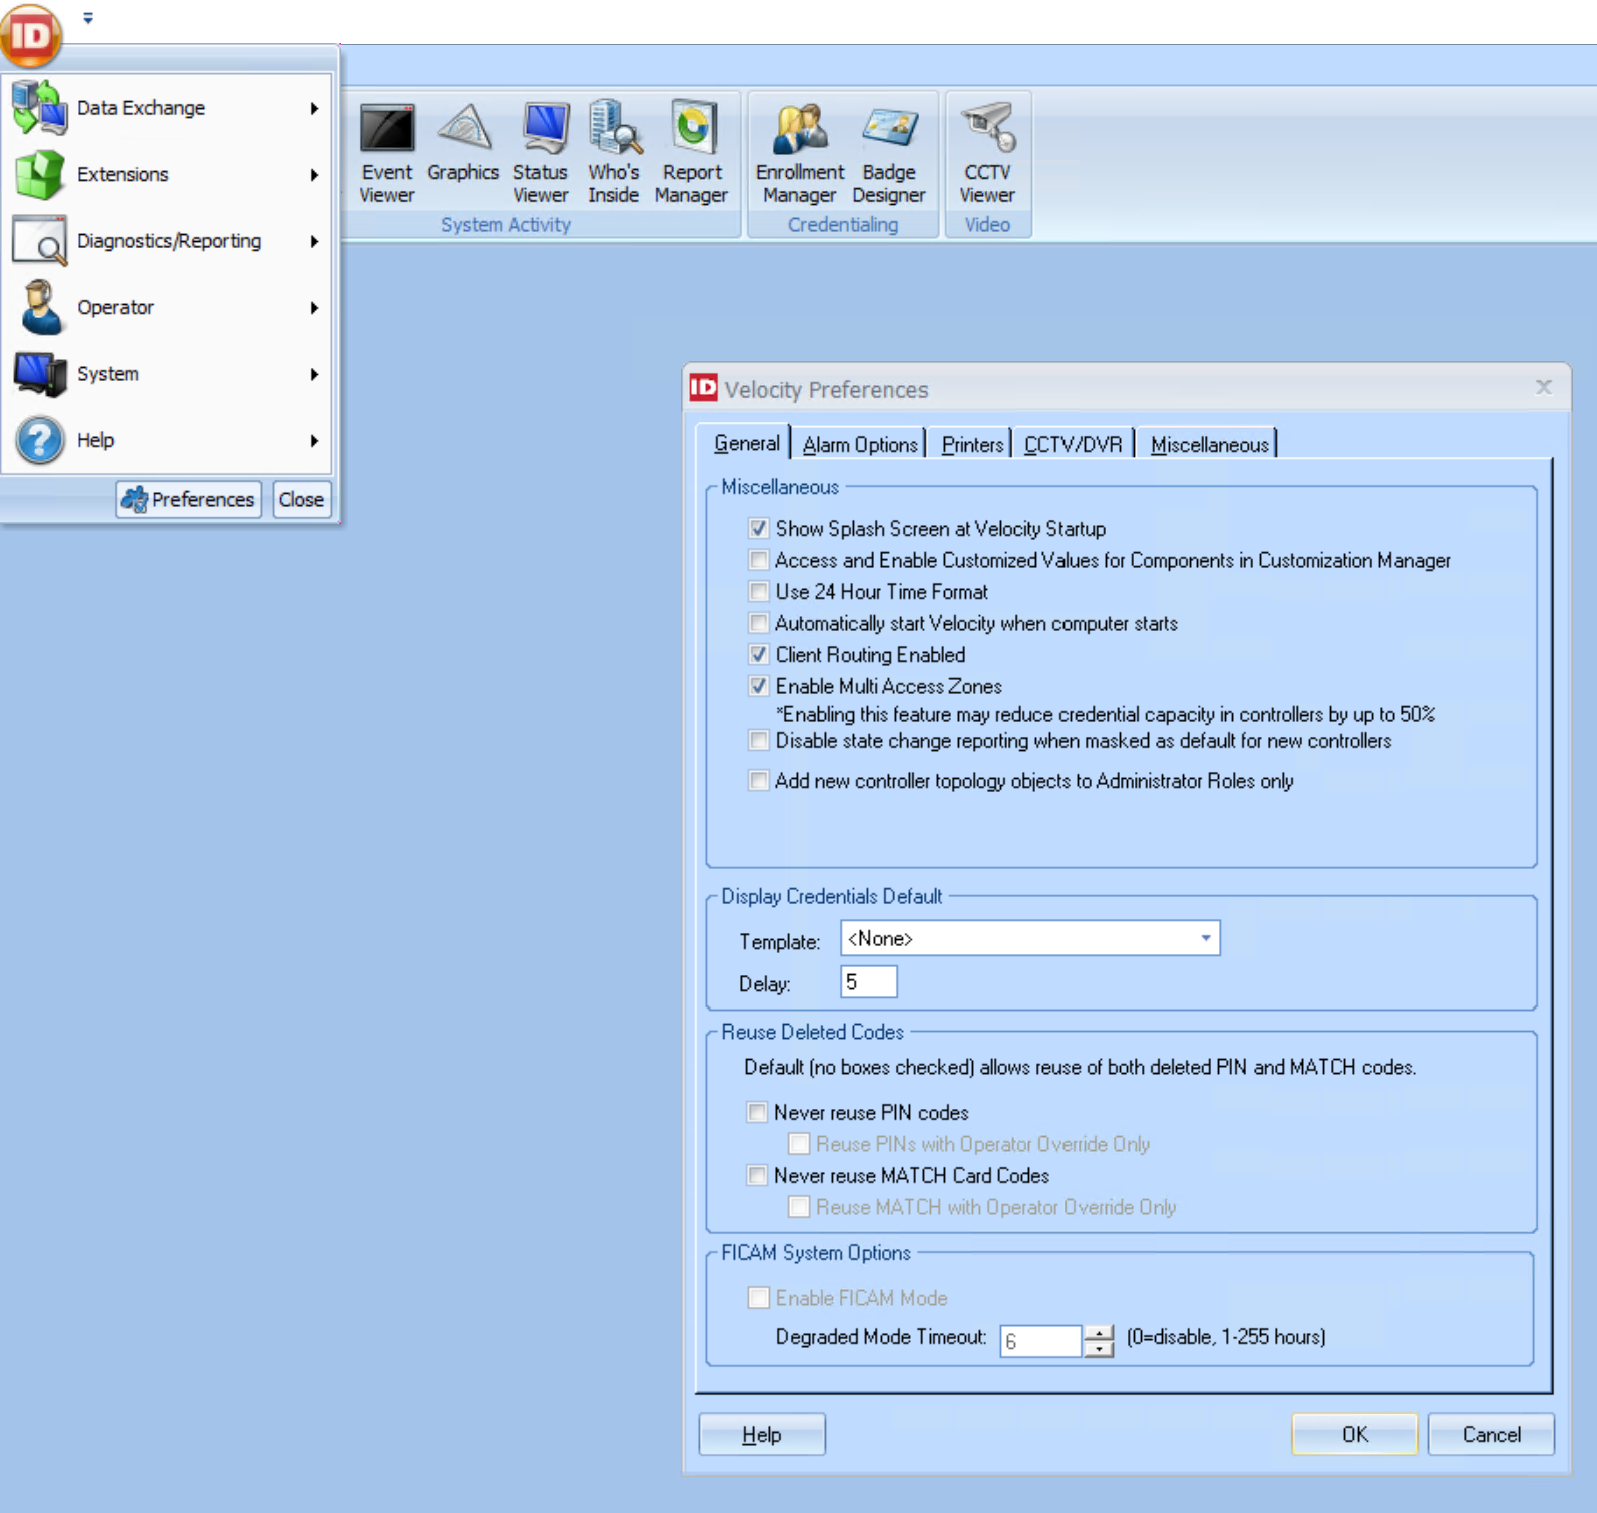
Click the Velocity menu button (top-left logo) and choose Preferences.
-
On the General tab, check Enable Multi Access Zones.
-
Click OK.
This setting allows up to nine Door Groups to be assigned to a single credential for the same controller and function.
Agent Configuration
General Agent Startup
Step 1: Download
To obtain the pacs-agent_{pacs-name} Docker image, follow the HID Agent Administration Guide for End-Customer.
Step 2: Create environment
Create a file named .env with the following content:
Agent__TenantId=example-tenant-id
Agent__PacsId=example-pacs-id
Auth__ClientId=your-client-id
Auth__ClientSecret=your-client-secret
In case you are connecting to a different environment than HID production, you need to set the proper URLs:
Auth__AuthNProvider=https://auth.example.com
Agent__PlatformUrl=https://platform.example.com
-
Adjust all file parameters according to your setup.
-
It is recommended to store this configuration on an encrypted drive or delete
.envfile as soon as the Docker image is executed.
Step 3: Run Docker image
docker run -d \
  --env-file .env \
  pacs-agent-{pacs-name}:latest
Step 4: Check that the Docker image is running
docker ps
Environment variables description
Related to HIS
-
Agent__PlatformUrl: HID Integration Service URL (https://his.hidglobal.com/ais/v1).-
This information is provided by HID. By default, this is set automatically to the production environment value and does not need to be set manually in most cases.
-
-
Agent__TenantId: Tenant ID within HID Integration Service.-
This information is provided by HID.
-
-
Agent__PacsId: Unique ID assigned to the agent during registration.-
This information is provided by HID.
-
If you registered your PACS on your own, this would be the
IDyou gave to the PACS.
-
Related to HID Authentication Service
-
Auth__AuthNProvider: HID Authentication Service URL (https://auth-us.api.hidglobal.com/idp/t89d23e0b2445510399335/authn).-
This information is provided by HID. By default, this is set automatically to the production environment value and does not need to be set manually in most cases.
-
-
Auth__ClientId: Client ID obtained during registration.-
This information is provided by HID.
-
-
Auth__ClientSecret: Client secret obtained during registration.-
This information is provided by HID.
-
Don't forget to replace the {pacs-name} placeholders with the actual name of the pact agent.
Payload logging (optional, diagnostic)
-
Agent__PayloadLogEnabled - set to
trueto log the HTTP request/response payloads exchanged with the Velocity REST API (for troubleshooting). Defaultfalse. -
Agent__PayloadLogPlaintext - set to
trueto log payloads unmasked. Defaultfalse(masked). Payloads may contain personal data - keep disabled unless needed.
Agent-specific configuration
{pacs-name} = hirsch_velocity
|
Setting |
Description |
Required |
|---|---|---|
|
|
Base URL of the Velocity REST API (for example, |
Yes |
|
|
User name of the Velocity Operator (created in Creating the Technical User). |
Yes |
|
|
Password of the Velocity Operator. |
Yes |
|
|
SQL Server connection string. Example: |
Yes |
|
|
Numeric TemplateID of the Badge Only (IDF=0) Credential Template. |
Yes |
|
|
Numeric TemplateID of the Card Only (IDF=2) Credential Template used for all card credential creation. The actual card format is selected per credential, independent of this template's default format. |
Yes |
|
|
Numeric |
No |
|
|
Master switch for experimental PIN write. When |
No |
|
|
Numeric TemplateID of the Keypad Only (IDF=1) Credential Template. Required only when |
Conditional |
|
|
Expected PIN length, must match the Code Length set on the PIN Credential Template. Set to |
No |
|
|
Array of mapped UDFs. Each entry has |
Yes |
|
|
Array of supported card formats exposed to AIS. Each entry has |
Yes |
Example of an agent-specific .env file
Velocity__Url=http://<velocity-server>:8080/
Velocity__Username=agent_user
Velocity__Password=<operator-password>
Velocity__ConnectionString=Server=<sql-server>\IDENTIV;Database=Velocity;User Id=sa;Password=<sa-password>;TrustServerCertificate=True;
Velocity__TechnicalBadgeTemplateId=160
Velocity__DefaultTemplateId=4
Velocity__SilhouettePhotoId=1
Velocity__EnableExperimentalPinWrite=false
Velocity__PinCredentialTemplateId=179
Velocity__PinLength=6

Velocity__ExtensionFields__0__UdfId=1
Velocity__ExtensionFields__0__Caption=externalId
Velocity__ExtensionFields__0__Type=String
Velocity__ExtensionFields__1__UdfId=2
Velocity__ExtensionFields__1__Caption=entityType
Velocity__ExtensionFields__1__Type=String
Velocity__ExtensionFields__2__UdfId=8
Velocity__ExtensionFields__2__Caption=email
Velocity__ExtensionFields__2__Type=String
Velocity__ExtensionFields__3__UdfId=9
Velocity__ExtensionFields__3__Caption=phoneNumber
Velocity__ExtensionFields__3__Type=String

Velocity__CardFormats__0__Name=Std 26-Bit Wiegand
Velocity__CardFormats__0__HostCardType=1
Velocity__CardFormats__0__CardIdMode=required
Velocity__CardFormats__0__CardIdMin=0
Velocity__CardFormats__0__CardIdMax=65535
Velocity__CardFormats__0__FacilityIdMode=ignored
Velocity__CardFormats__1__Name=Passthru
Velocity__CardFormats__1__HostCardType=36
Velocity__CardFormats__1__CardIdMode=required
Velocity__CardFormats__1__CardIdMin=0
Velocity__CardFormats__1__CardIdMax=9999999999999999
Velocity__CardFormats__1__FacilityIdMode=ignored
Velocity__CardFormats__2__Name=Octal Passthru
Velocity__CardFormats__2__HostCardType=43
Velocity__CardFormats__2__CardIdMode=required
Velocity__CardFormats__2__CardIdMin=0
Velocity__CardFormats__2__CardIdMax=9999999999999999
Velocity__CardFormats__2__FacilityIdMode=ignored
Customize HostCardType, CardIdMin / CardIdMax and Name per the card formats actually used at the deployment. Adjust the number of ExtensionFields and CardFormats entries to match your installation.
Limitations
Unsupported operations
|
Operation |
Note |
|---|---|
|
Identity Activate / Deactivate |
Velocity does not provide a person-level Active/Inactive state; identities are always considered Active. |
|
Visit Check-In / Check-Out |
Velocity does not provide a native check-in/check-out mechanism |
|
Events Writing to the PACS |
|
Limited operation
|
Operation |
Note |
|---|---|
|
Identity / Visit PIN - Create / Update |
Disabled by default. Velocity's REST API does not accept PIN values for Keypad credentials, so the agent supports PIN write via direct database insert, gated by |
Other limitations
-
Card number length: bounded per format in
Velocity__CardFormats__*__CardIdMax(admin-configured). The HIS contractCardIdis a 64-bit signed integer (max 19 digits), which sets the absolute upper bound regardless of configuration. -
Card number uniqueness: Velocity rejects credentials with a MATCH already assigned to another person.
-
PIN credentials do not expose Extension Fields: the PIN value is never returned to AIS for security reasons; Activate / Deactivate / Get PIN responses contain no Extension Fields.
-
Field length limits: User Defined Field (extension field) values are limited to 50 characters; the first name to 32 characters and the last name to 80 characters. Values exceeding these limits are rejected with a descriptive error identifying the field.
-
Decimal UDF emulation: Velocity's native Number UDF accepts only integers; decimal values are stored as Text UDFs.
-
Boolean UDF emulation: Velocity has no native Boolean UDF type; Boolean values are stored as Text UDFs (
"true"/"false"). -
DateTime UDF precision: Velocity's Date UDF stores only the date component; the time portion is discarded.
-
Pictures via database: Velocity does not expose person pictures via the REST API. The agent reads and writes pictures directly in the SQL Server
UserImagestable; this is why a SQL Server connection string is required in the agent configuration. Each user with a custom picture has a dedicated row inUserImages; users without a picture share a default silhouette row identified byVelocity__SilhouettePhotoId(default1) which the agent never overwrites. The agent automatically converts any incoming image (PNG, JPEG, etc.) to JPEG before storing. -
Multi Access Zones: must be enabled in the Velocity desktop client preferences (see https://hidis.atlassian.net/wiki/spaces/UD/pages/207847426/HIS+Hirsch+Velocity+Agent#Enable-Multi-Access-Zones) to allow multiple Door Groups per credential.
-
Modified-since: filter is evaluated against the Velocity SQL Server
Users.LastUpdatedcolumn. NTP synchronization between the AIS host and the Velocity SQL Server is recommended to avoid records near the time boundary being missed or returned twice.
Naming Mapping
Entities
|
AIS Entity Name |
PACS GUI Term |
|---|---|
|
Identity |
Person (with UDF EntityType = |
|
Visit |
Person (with UDF EntityType = |
|
Credential |
Card (Credential of IDF 2, Card Only) |
|
PIN |
Credential of IDF 1 (Keypad Only) |
|
Card Format |
Card Type ( |
|
Access Unit |
Door Group |
|
Extension Field |
User Defined Field (UDF) |
Operations
|
AIS Operation Name |
PACS GUI Term |
|---|---|
|
Create Identity / Visit |
Add Person (Enrollment Manager → Add New Person) |
|
Remove Identity / Visit |
Delete Person |
|
Activate / Deactivate Identity |
Not supported |
|
Check-In / Check-Out Visit |
Not supported |
|
Activate Credential |
Set Activation Date in the past (REST |
|
Deactivate Credential |
Set Activation Date in the future (REST |
Creation of extension fields
Manual for Creating an EF in the PACS
User Defined Fields (UDFs) are the Velocity equivalent of Extension Fields. UDFs are defined globally in Velocity and then mapped to AIS Extension Fields via the agent configuration.
-
In the Velocity desktop client, open the Enrollment Manager, then in its menu choose Tools → User Defined Fields.
-
Click Add (or edit an existing UDF).
-
Set the Caption (display name) and the Type.
-
Save.
-
Note the numeric UDF id assigned by Velocity. This id is entered in the agent configuration under
VelocityOptions.ExtensionFieldstogether with the matching Caption and AIS-side Type.
These fields are optional and only required if Extension Field mapping has been configured for this agent in AIS.
Supported entities and data types
List of Entities Supporting Extension Fields (Relevant to AIS)
|
Entity |
Supports Extension Fields |
|---|---|
|
Identity |
Yes |
|
Visit |
Yes |
|
Credential |
Yes - native fields |
|
PIN |
No - PIN value is never returned to AIS |
|
Access Unit |
No |
List of Supported Data Types for Extension Fields
|
Variable type (AIS) |
Variable type (Hirsch Velocity) |
|---|---|
|
Boolean |
Text (emulated as |
|
Integer |
Number |
|
String |
Text |
|
Decimal |
Text (emulated; Velocity Number UDF accepts only integers) |
|
DateTime |
Date (date only; time component is discarded) |
The required system UDFs (ExternalId as Unique Text, EntityType as Text) are not exposed to AIS as Extension Fields - they are used internally by the agent.
Events
The agent processes Velocity events using polling.
-
A background worker polls Velocity's transaction event API at a configurable interval (default: 15 seconds).
-
The agent retrieves new events since the previous poll and processes them in order.
-
Events occurring during a network outage or agent downtime may be lost; durable delivery is not guaranteed.
Miscellaneous
Experimental PIN write
The agent supports creating and updating PIN values via direct database writes when EnableExperimentalPinWrite=true. This functionality relies on internal Velocity database structures that are not officially documented by the vendor. A Velocity version upgrade may change these structures and break PIN write operations. If PIN write stops working after a Velocity upgrade, set EnableExperimentalPinWrite=false and contact HID support.
Velocity enforces PIN code uniqueness across the entire system. Attempts to create a PIN that collides with an existing PIN (including in deactivated credentials) will fail. The agent attempts a best-effort cleanup of the orphaned credential when this happens, but in rare cases manual intervention may be required.
JWT token lifetime
The REST API issues JWT tokens with a five-year lifetime. The agent reuses the token until receiving an HTTP 401 response, at which point it re-authenticates automatically.
Velocity Web Services Client (VWSC)
The Velocity Web Services Client (VWSC) browser-based interface is independent of the REST API used by the agent. The agent does not require VWSC to be installed or running.
Velocity version
Verify the installed Velocity version in the Velocity desktop client via Help → About.