Introduction
This document describes the requirements and steps for setting up the Avigilon Alta integration with the AIS agent.
Prerequisites
Required Software
-
Avigilon Alta is a cloud-native platform. All features available via the Alta Access endpoint are supported.
-
For supported PACS version, please see the HID Knowledge Base compatibility matrix: Requirements .
Required Licenses
The agent requires an Alta Premium or Enterprise license. The following features included in these tiers are used by the agent:
-
API integration — required for communication between the agent and the Alta platform
-
Custom fields — required if extension fields are configured
It is recommended to have a separate user account for the agent.
Required Permissions for Technical User
A dedicated user account with a confirmed email address is required. The technical user must be assigned the Super Admin role.
|
Permission |
Description |
|
Super Admin role |
Full access to manage users, credentials, access groups, and custom fields |
|
Portal Access |
Must be enabled - user must activate account via invitation email |
It is recommended to have a separate user for the agent.
Configuration
PACS Configuration
Creating the technical user
-
Log in to the Alta Access portal.
-
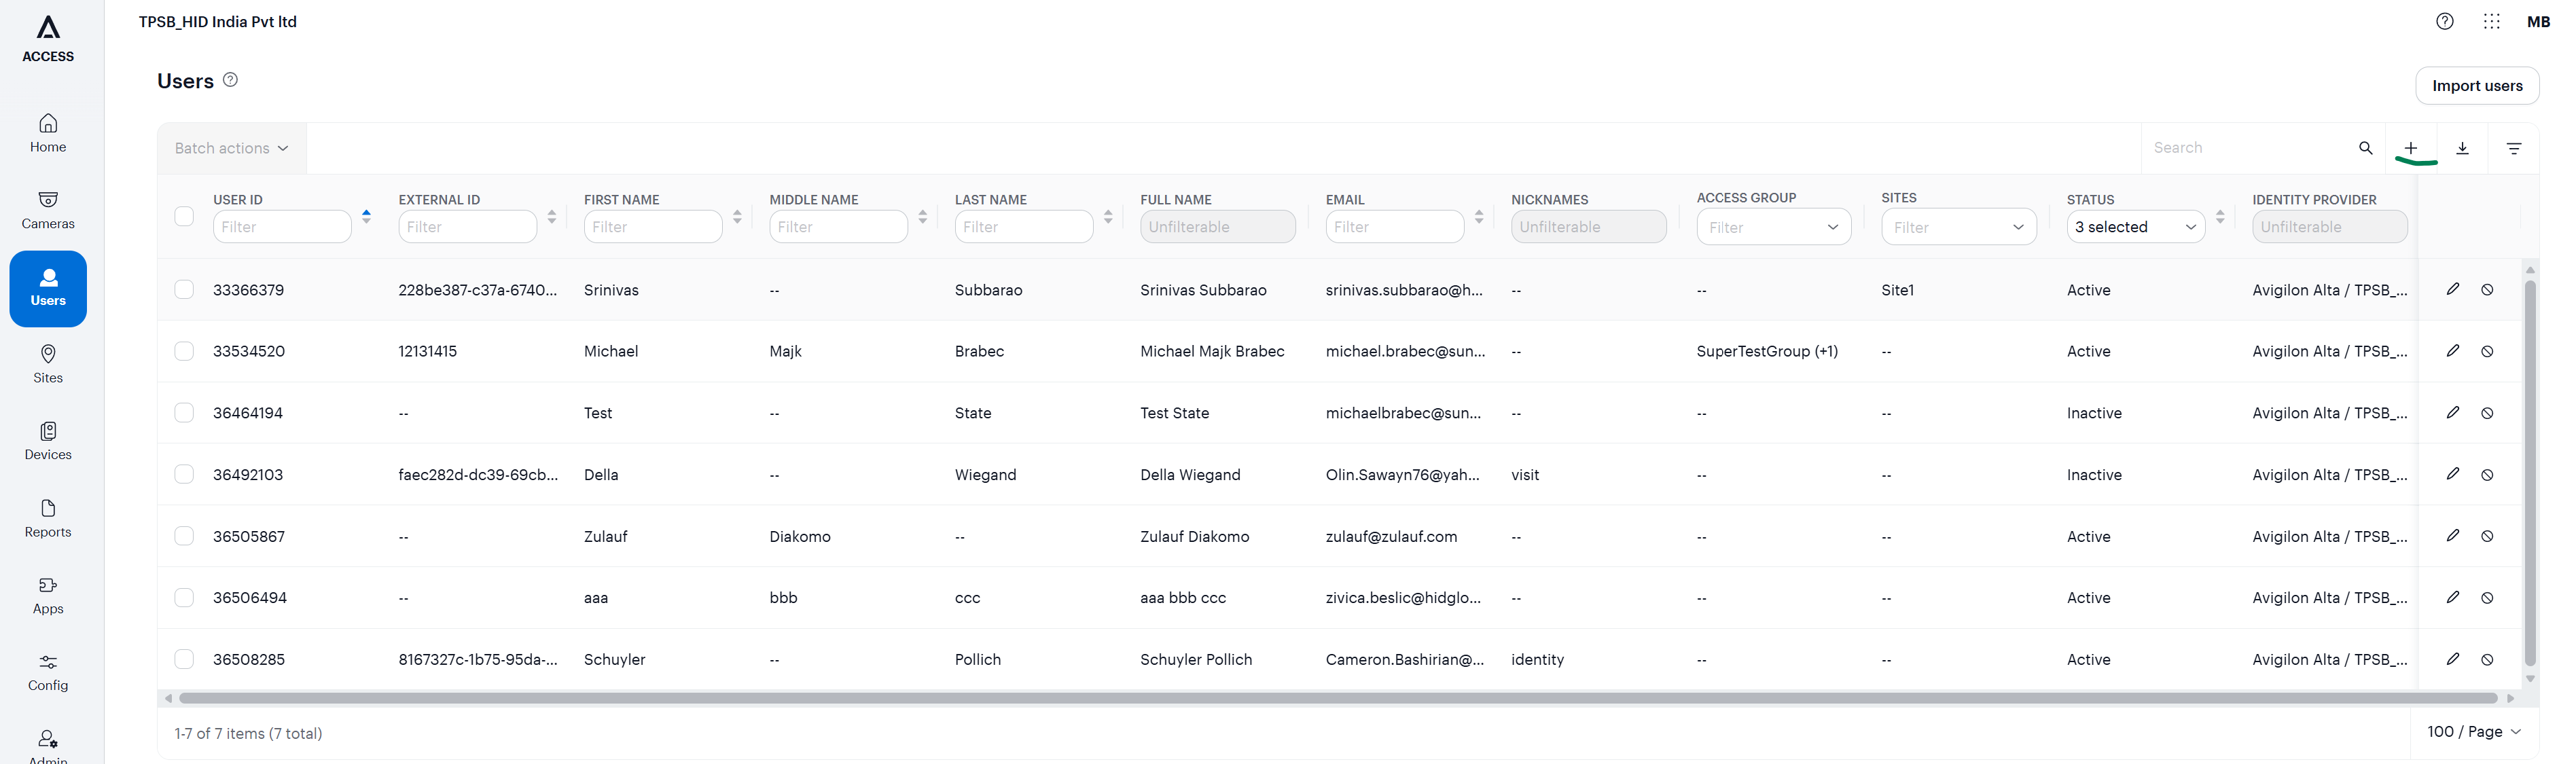
Go to the Users section and create a new user by clicking the "+" (plus) icon in the top right corner.
-
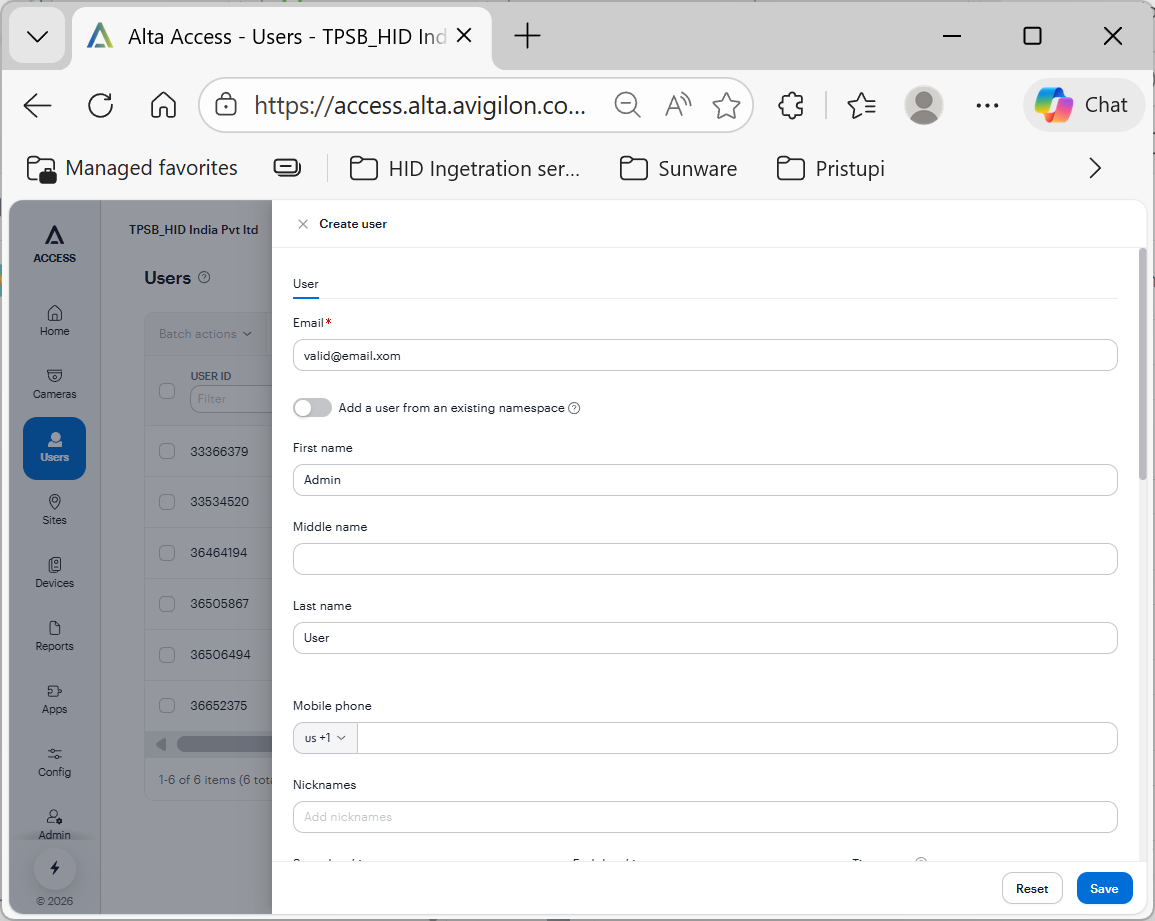
Fill out the account details: Valid e-mail address, First Name, Last Name.
-
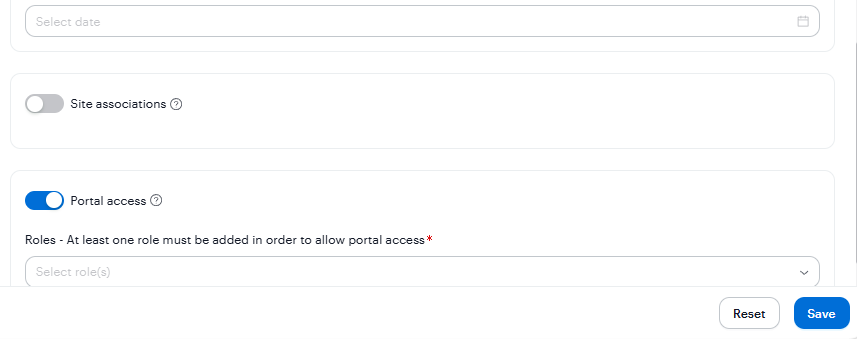
Enable Portal Access: Toggle the Portal access switch to the ON position.
-
Assign the Super Admin role to this user.
-
Click on the
Savebutton.
The user must activate the account via the invitation email and set a password.
Advanced Configuration (Optional)
If the integration requires synchronizing additional metadata or custom data points from AIS to Avigilon Alta, you can configure Custom Fields. See https://hidis.atlassian.net/wiki/spaces/UD/pages/edit-v2/154664961#Creation-of-extension-fields.
Agent Configuration
General Agent Startup
Step 1: Download
To obtain the pacs-agent_{pacs-name} Docker image, follow the HID Agent Administration Guide for End-Customer.
Step 2: Create environment
Create a file named .env with the following content:
Agent__TenantId=example-tenant-id
Agent__PacsId=example-pacs-id
Auth__ClientId=your-client-id
Auth__ClientSecret=your-client-secret
In case you are connecting to a different environment than HID production, you need to set the proper URLs:
Auth__AuthNProvider=https://auth.example.com
Agent__PlatformUrl=https://platform.example.com
-
Adjust all file parameters according to your setup.
-
It is recommended to store this configuration on an encrypted drive or delete
.envfile as soon as the Docker image is executed.
Step 3: Run Docker image
docker run -d \
  --env-file .env \
  pacs-agent-{pacs-name}:latest
Step 4: Check that the Docker image is running
docker ps
Environment variables description
Related to HIS
-
Agent__PlatformUrl: HID Integration Service URL (https://his.hidglobal.com/ais/v1).-
This information is provided by HID. By default, this is set automatically to the production environment value and does not need to be set manually in most cases.
-
-
Agent__TenantId: Tenant ID within HID Integration Service.-
This information is provided by HID.
-
-
Agent__PacsId: Unique ID assigned to the agent during registration.-
This information is provided by HID.
-
If you registered your PACS on your own, this would be the
IDyou gave to the PACS.
-
Related to HID Authentication Service
-
Auth__AuthNProvider: HID Authentication Service URL (https://auth-us.api.hidglobal.com/idp/t89d23e0b2445510399335/authn).-
This information is provided by HID. By default, this is set automatically to the production environment value and does not need to be set manually in most cases.
-
-
Auth__ClientId: Client ID obtained during registration.-
This information is provided by HID.
-
-
Auth__ClientSecret: Client secret obtained during registration.-
This information is provided by HID.
-
Don't forget to replace the {pacs-name} placeholders with the actual name of the pact agent.
Agent-specific configuration
{pacsd-name} = avigilon_alta
Environment variables description:
-
AvigilonAlta__BaseUrl: The official Alta API endpoint. Example:https://api.openpath.com -
AvigilonAlta__Organization__Id: This is unique numeric Organization ID within the Avigilon Alta system.-
This ID is automatically assigned during the registration process.
-
Log in to the Alta Access portal. Once logged in, you can find your Organization ID in the browser's URL bar. It is the number following the organization name path.
-
Example: https://control.openpath.com/admin/organizations/74479/dashboard - ID is 74479
-
-
AvigilonAlta__Credentials__Email: The email address of the Technical User created in the PACS configuration step.-
Guide: Follow the steps for https://hidis.atlassian.net/wiki/spaces/UD/pages/edit-v2/154664961#Creating-the-technical-user
-
-
AvigilonAlta__Credentials__Password: The password corresponding to the Technical User.
Agent-specific .env file part example:
AvigilonAlta__BaseUrl=< https://api.openpath.com >
AvigilonAlta__Organization__Id=<organization-id>
AvigilonAlta__Credentials__Email=<technical-user-email>
AvigilonAlta__Credentials__Password=<password>
Limitations
Unsupported operations
-
Events Writing to the PACS
Limited operation
|
Operation |
Note |
|
Visit.CheckInAt |
Avigilon Alta does not support check-in/check-out dates, which means the flag |
|
Identity → Create
|
|
|
Identity & Visit Export operations |
Filtering by the |
|
Identity & Visit PIN operations |
|
Other limitations
-
Extension Fields (Custom Fields): Custom Fields are organization-wide and must be manually created in the Alta portal before the agent can use them.
-
Custom Extension fields for PINs and Credentials are not supported; however, the HIS agent supports mapping to native Extension Fields (
StartDate,EndDate,AllowReassign,andNumberfor Credentials, andStartDateandEndDatefor PINs). -
Search Results Limit: API search queries are limited to a maximum of 1000 records per request.
-
PIN Assignment: PIN must be 4-16 digits numeric.
Naming Mapping
Entities
|
AIS Entity Name |
PACS GUI Term |
|
Identity |
User (with nickname: |
|
Visit |
User (with nickname: |
|
Card Format |
Wiegand credential type |
|
Access Unit |
Access Group |
|
Extension field |
Custom Field |
Operations
|
AIS Operation Name |
PACS GUI Term |
|---|---|
|
Activate |
Set Person Status - Active (Enable user account) |
|
Deactivate |
Set Person Status - Inactive (Disable user account) |
|
Check-In |
Set Person Status - Active (Enable user account) |
|
Check-Out |
Set Person Status - Inactive (Disable user account |
|
Create Identity/Visit |
Add User |
|
Remove Identity/Visit |
Purge User |
Creation of extension fields
Manual for Creating an EF in the PACS
The agent supports custom data mapping through the Alta Custom Fields feature.
-
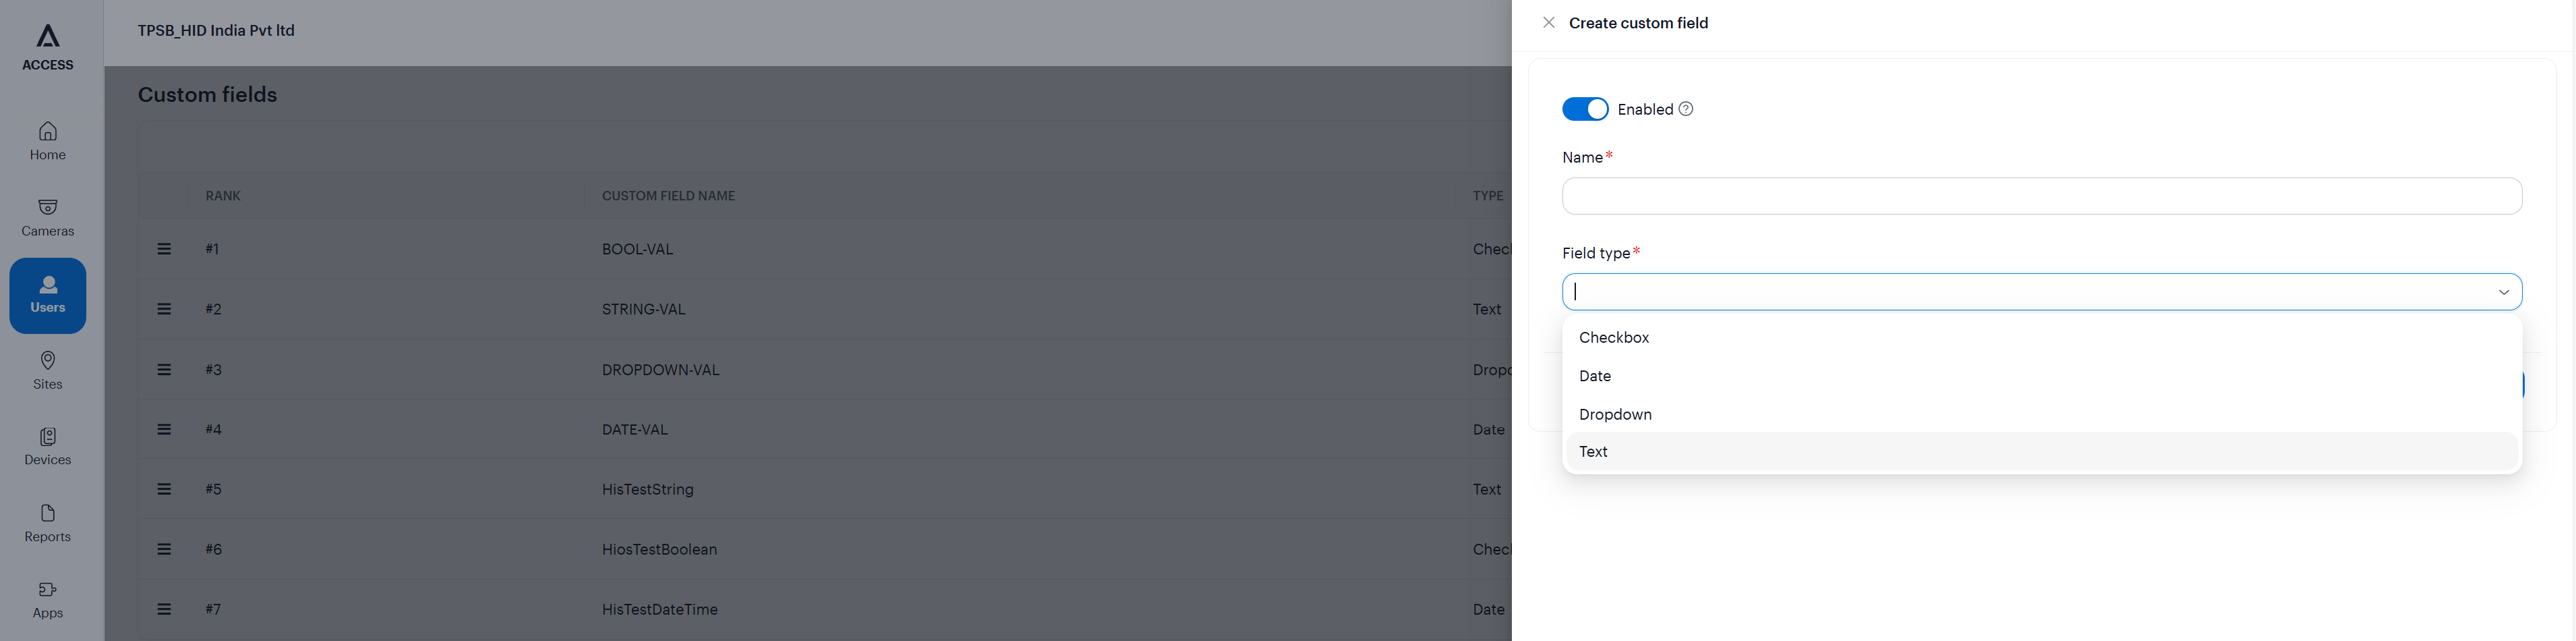
Navigate to:
Users > Custom Fields. -
Add a new field: Click the "+" (plus) icon in the top right corner.
-
Configure settings:
-
Enabled: Ensure the toggle is set to ON.
-
Name: CustomField1 (or your specific field name as defined in your Agent configuration).
-
Field type: Select Text.
-
-
Save: Click the save button to finalize.
These fields are entirely optional and are only required if custom field mapping has been configured in AIS for this agent.
Supported entities and data types
List of Entities Supporting Extension Fields (Relevant to AIS)
|
Entity |
Supports EFs |
|---|---|
|
Identity |
Yes |
|
Visit |
Yes |
|
Credential |
No |
|
Access Unit |
No |
List of Supported Data Types for Extension Fields
|
Variable type (AIS) |
Variable type (Avigilon Alta) |
|---|---|
|
Boolean |
Checkbox |
|
Integer |
Text (Emulated) |
|
String |
Text |
|
Decimal |
Text (emulated) |
|
DateTime |
Date |
Additional information
Events
The agent processes events using polling.
-
Polling: A fallback mechanism (default: 15 seconds) polls the activity API to ensure no events are missed during network instability.
-
The agent retrieves new events periodically and processes them in order of occurrence.