Prerequisites
-
This document describes all supported versions of the agent.
-
Supported PACS versions: Requirements
-
A ProWatch user with access to Administration is needed to make all settings mentioned in this document.
-
The agent also needs a user with access to the Administration. It’s recommended to have a separate user for the Agent.
Configuration
PACS Configuration
Creating the technical user
-
Go to ProWatch machine and open ProWatch Manager.
-
Select Database Configuration on the left menu.
-
Find and select
Users -
Click on
New users...in a menu which is shown after clicking on the right mouse button.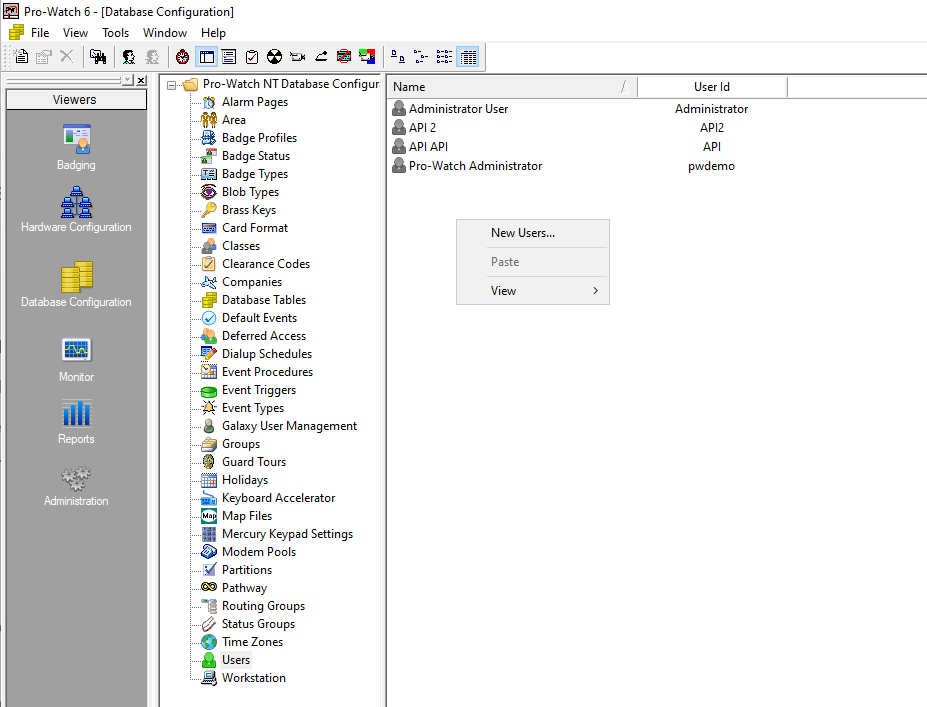
-
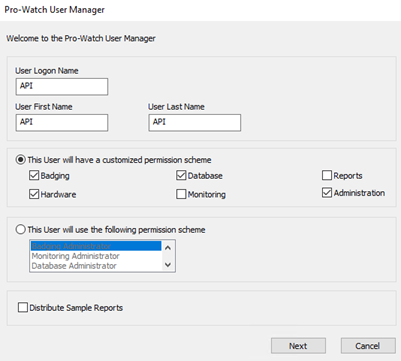
Fill out the account:
-
Logon name and First name and Last name.
-
Select permissions:
Badging,Database,Hardware,Administrator.
-
-
Click on the
Next button. -
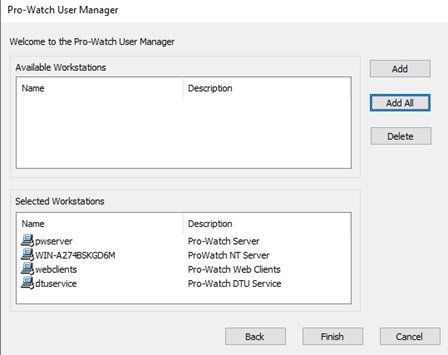
Add All workstations.
-
Click on the
Finish button. -
Add a Web password to the User information tab.
-
The new account is usable for the agent when all these steps are finished.
Creating a new technical user type
-
Go to the ProWatch Manager.
-
Click on Database Configuration in the left menu.
-
Click on the Database Configuration button.
-
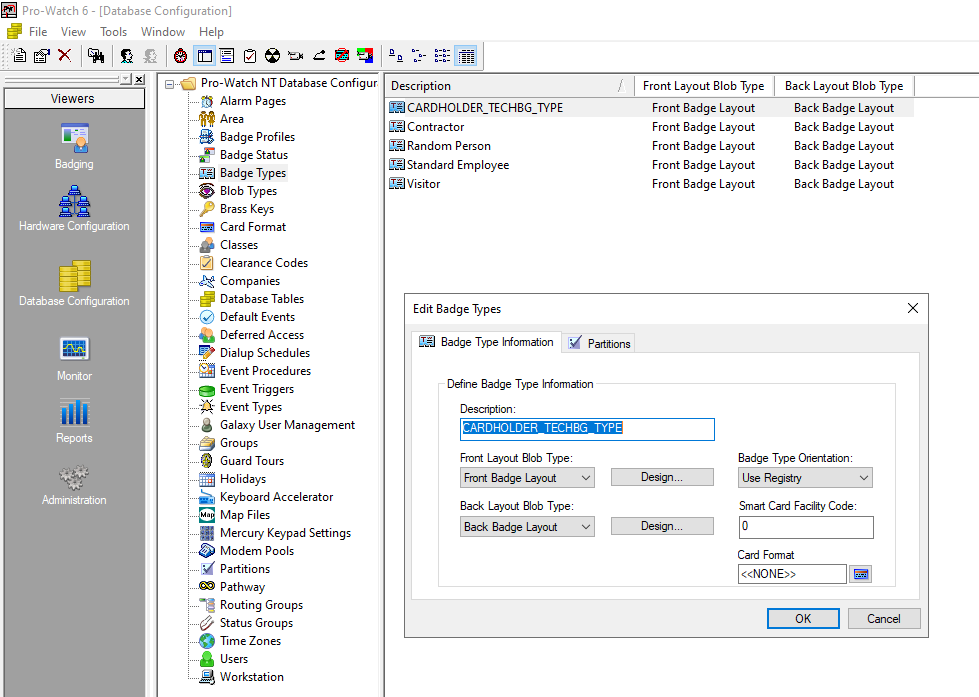
Click on the Badge Types.
-
Call it like
CARDHOLDER_TECHBG_TYPEor similar. Add this value into the Agent-specific configuration.
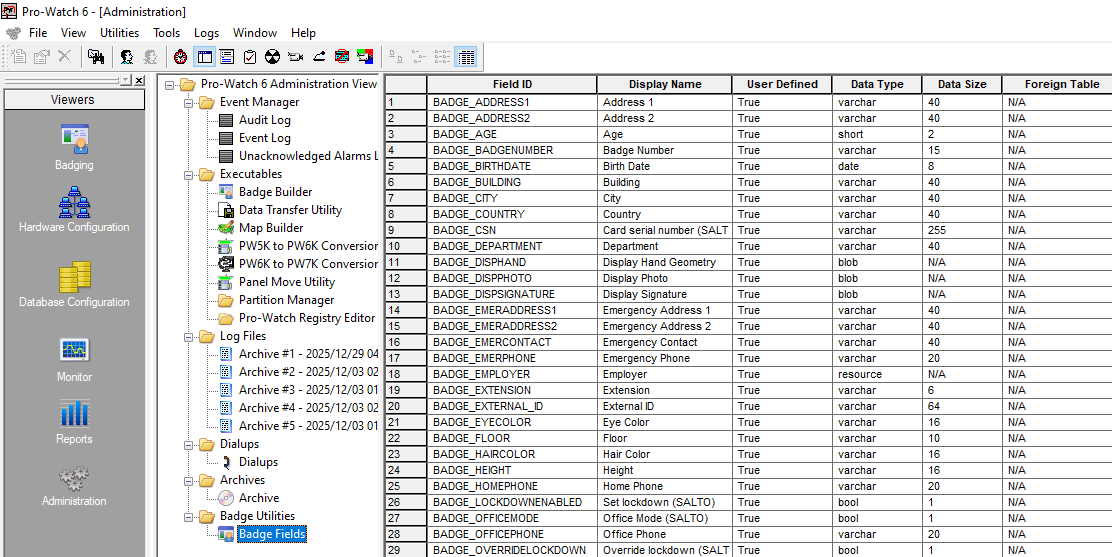
Creating technical custom fields
Create BADGE_EXTERNAL_ID of type Varchar(64) in
-
Please, check the Creation of extension field section to read how to create a new extension field.
-
Add this value into the Agent-specific configuration.
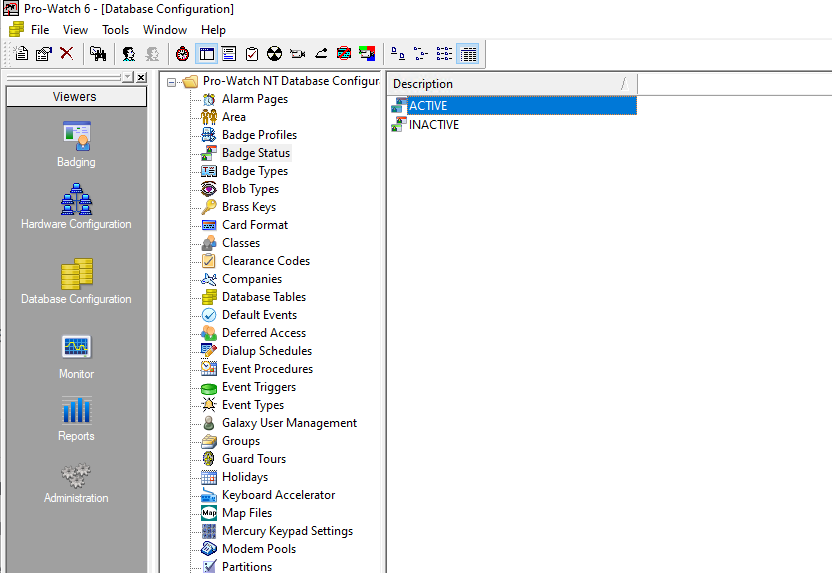
Find Badge Statuses
Find a representation of an Active and Inactive badge. Take it from
-
Go to the ProWatch Manager.
-
Click on Database Configuration in the left menu.
-
Click on the Database Configuration button.
-
Click on the Badge Status
-
Add these values into the Agent-specific configuration.
Find Identity and Visit types
Find a type Identityand Visit badges.
-
Go to the ProWatch Manager.
-
Click on Database Configuration in the left menu.
-
Click on the Database Configuration button.
-
Click on the Badge Types
-
Add these values into the Agent-specific configuration.
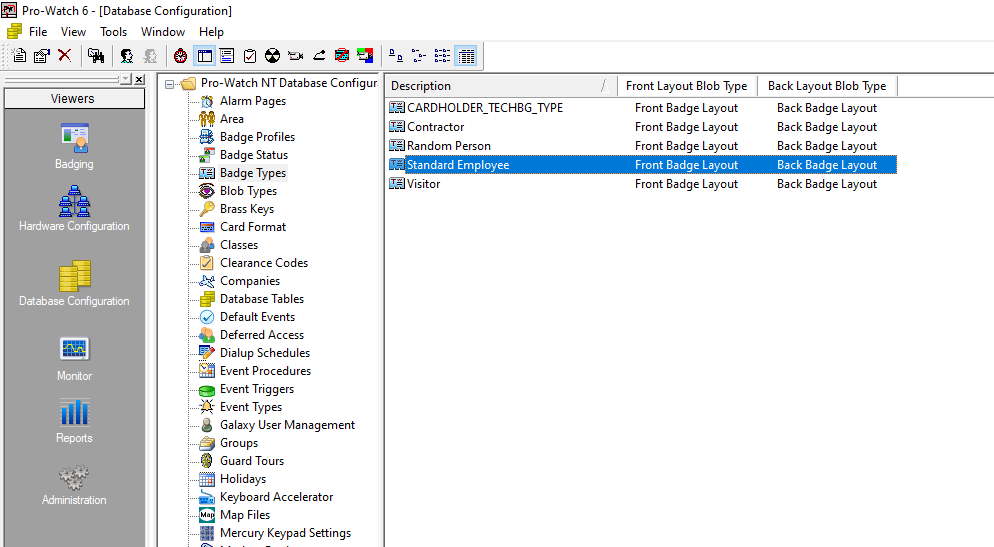
Only one type can be used for Identity and different one for Visit.
Newly created Identities/Visits are going to be assigned into these types automatically.
Agent Configuration
General agent startup
Step 1: Download
To obtain the pacs-agent_{pacs-name} Docker image, follow the HID Agent Administration Guide for End-Customer.
Step 2: Create environment
Create a file named .env with the following content:
Agent__TenantId=example-tenant-id
Agent__PacsId=example-pacs-id
Auth__ClientId=your-client-id
Auth__ClientSecret=your-client-secret
In case you are connecting to a different environment than HID production, you need to set the proper URLs:
Auth__AuthNProvider=https://auth.example.com
Agent__PlatformUrl=https://platform.example.com
-
Adjust all file parameters according to your setup.
-
It is recommended to store this configuration on an encrypted drive or delete
.envfile as soon as the Docker image is executed.
Step 3: Run Docker image
docker run -d \
  --env-file .env \
  pacs-agent-{pacs-name}:latest
Step 4: Check that the Docker image is running
docker ps
Environment variables description
Related to HIS
-
Agent__PlatformUrl: HID Integration Service URL (https://his.hidglobal.com/ais/v1).-
This information is provided by HID. By default, this is set automatically to the production environment value and does not need to be set manually in most cases.
-
-
Agent__TenantId: Tenant ID within HID Integration Service.-
This information is provided by HID.
-
-
Agent__PacsId: Unique ID assigned to the agent during registration.-
This information is provided by HID.
-
If you registered your PACS on your own, this would be the
IDyou gave to the PACS.
-
Related to HID Authentication Service
-
Auth__AuthNProvider: HID Authentication Service URL (https://auth-us.api.hidglobal.com/idp/t89d23e0b2445510399335/authn).-
This information is provided by HID. By default, this is set automatically to the production environment value and does not need to be set manually in most cases.
-
-
Auth__ClientId: Client ID obtained during registration.-
This information is provided by HID.
-
-
Auth__ClientSecret: Client secret obtained during registration.-
This information is provided by HID.
-
Don't forget to replace the {pacs-name} placeholders with the actual name of the pact agent.
Agent-specific configuration
{pacsd-name} = prowatch
Environment variables for Honeywell Prowatch Agent:
-
ProWatch__Api__ServiceUrl: IP address or domain of AUA. E.g., https://10.154.52.146:8734/pwapi/ -
ProWatch__Api__Username: Username from creating the technical user section. -
ProWatch__Api__Password: Password for the username above. -
ProWatch__ApiEvents__ServiceUrl: IP address or domain of SignalR server. E.g., https://10.154.52.146:8735/ -
ProWatch__ApiEvents__UserName: Username from creating the technical user section. You can use the same as for API or different with same permissions. -
ProWatch__ApiEvents__WorkstationNames__<i>: Agent supports watching of events from multiple Workstations.<i>is an index from 0. E.g 0, 1, 2, …, n. Value should be a name of the workstation. Multiple workstations means multipleProWatch__ApiEvents__WorkstationNames__<i>lines with iterated<i>. -
ProWatch__Fields__ExternalIdFieldKey: The name of external id key in custom fields. Use the same as in 2.1.3 Creating technical custom fields -
ProWatch__Fields__IdentityTypeKey: Use the name of Badge Type. Please, check the section Find Identity and Visit types. -
ProWatch__Fields__VisitTypeKey: Use the name of Badge Type. Please, check the section Find Identity and Visit types. -
ProWatch__Fields__BadgeActiveStatusKey: Get a status which represents Active state.
Please, check the section Find Badge Statuses. -
ProWatch__Fields__BadgeInactiveStatusKey: Get a status which represents Inactive state.
Please, check the section Find Badge Statuses. -
ProWatch__Fields__CompanyKey: Use the name of a Company. This Company is going to be used by default.
ProWatch Manager / Database Configuration / Companies. -
ProWatch__Fields__TechnicalBadgeTypeKey: Use the same name as in Required PACS-side settings.
Agent-specific .env file part example:
ProWatch__Api__ServiceUrl=<URL-to-api>
ProWatch__Api__Username=<user-name>
ProWatch__Api__Password=<password>
ProWatch__ApiEvents__ServiceUrl=<URL-to-SignalR>
ProWatch__ApiEvents__UserName=<user-name>
ProWatch__ApiEvents__WorkstationNames_0=<workstation-name-a>
ProWatch__ApiEvents__WorkstationNames_1=<workstation-name-b>
ProWatch__Fields__ExternalIdFieldKey=BADGE_EXTERNAL_ID
ProWatch__Fields__IdentityTypeKey=Standard Employee
ProWatch__Fields__VisitTypeKey=Visitor
ProWatch__Fields__BadgeActiveStatusKey=ACTIVE
ProWatch__Fields__BadgeInactiveStatusKey=INACTIVE
ProWatch__Fields__CompanyKey=NexWatch
ProWatch__Fields__TechnicalBadgeTypeKey=CARDHOLDER_TECHBG_TYPE
Limitations
-
Extension fields have to be created manually; please see the extension field setup.
Unsupported operations
-
CreatePin(Identity / Visit) -
GetPin(Identity / Visit) -
UpdatePin(Identity / Visit) -
RemovePin(Identity / Visit) -
ActivatePin(Identity / Visit) -
DeactivatePin(Identity / Visit) -
Events Writing to the PACS
Limited operation
|
Operation |
Note |
|---|---|
|
|
Visit CheckInVisit and CheckOutVisit are working but ProWatch does not support Check in/out dates which means a flag CheckInAt is always null. |
|
|
The Facility ID is not supported by ProWatch. The Agent ignores the value. And returns 0 in places where it is mandatory. |
|
|
The Type is not supported by ProWatch. The Agent ignores the value. And returns Token Type in this field. |
|
Credential extension fields (Identity / Visit) |
The Extension Fields for Identity Credentials and Visit Credentials are not supported. Provides the self only. |
|
|
Access Unit is linked to Cards. Not to Identity. Agents create a technical card if there is no card assigned yet. Agent updates Access units on all cards linked to a person. |
Naming Mapping
Entities
|
AIS Entity Name |
PACS GUI Term |
|---|---|
|
Identity |
Badge (type: Standard Employee) |
|
Visit |
Badge (type: Visitor) |
|
Card Format |
No entity available |
|
Identity Credential |
Card |
|
Visit Credential |
Card |
|
Access Unit |
Clearance |
|
Identity Access |
Clearance |
|
Visit Access |
Clearance |
Operations
|
AIS Entity Name |
PACS GUI Term |
|---|---|
|
Check-In |
Activate |
|
Check-Out |
Deactivate |
Known Issues
ServiceUrl
-
make sure that it ends with /
Creation of extension fields
Manual for Creating an EF in the PACS
-
Go to the ProWatch Manager.
-
Click on Administration in the left menu.
-
Click on the “Badge Fields” button.
-
Click on the table with the right button mouse and select “Add Badge Field”.
-
Fill the name + other settings – depending on what you need.
-
Click on the Ok button.
Supported entities and data types
|
Entity |
Support EFs |
|---|---|
|
Identity |
Yes |
|
Visit |
Yes |
|
Credential |
No |
|
Access Unit |
No |
|
Variable type (AIS) |
Variable type (ProWatch) |
Note (ProWatch) |
|---|---|---|
|
Not supported |
Resource |
|
|
String |
Text |
|
|
Datetime |
DateTime |
ProWatch supports three decimal places. |
|
DateTime |
String |
It supports smaller units than just three decimal places. |
|
Not supported |
AppType |
|
|
Not supported |
Blob |
|
|
Boolean |
Boolean |
|
|
String |
Short |
|
|
Integer |
Integer |
|
|
Decimal |
Decimal |
|