Prerequisites
-
Access to DSX GUI.
-
To have an Operator's username + password.
-
-
Access to the machine where DSX is installed.
-
The Agent needs a connection string to access the DSX SQL Database.
-
DSX SQL Database should be accessible for the Agent.
-
The DSX folder must be accessible at the system level for the Agent.
-
Supported PACS versions: Requirements
Configuration
PACS Configuration
Access to DSX folder
On the server where DSX is installed:
-
Open File Explorer.
-
Locate the folder:
C:\WinDSX -
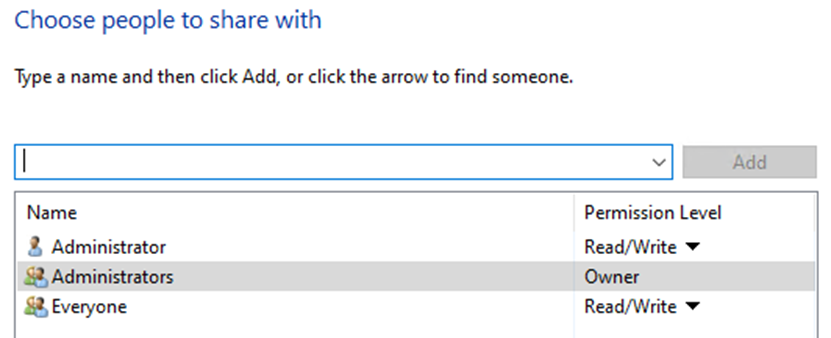
Share this folder on the network as:
\\<hostname>\WinDSX-
Replace
<hostname>with the server’s actual name. -
Share the folder with a user who should be set up in the Agent configuration.
-
Turn on the Samba v2
On the server where DSX is installed:
-
Open PowerShell.
-
Run the command for turning on the Samba v2 protocol.
Set-SmbServerConfiguration -EnableSMB2Protocol $true -
Allow Samba on Firewall
netsh advfirewall firewall add rule name="SMB" dir=in action=allow protocol=TCP localport=445
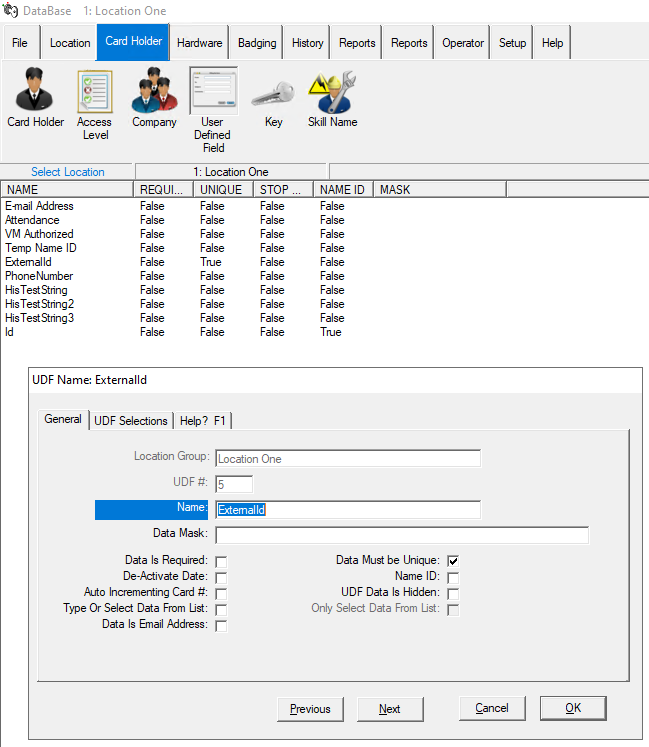
Creating technical custom fields
-
Please check the Creation of extension field section to read how to create a new extension field.
-
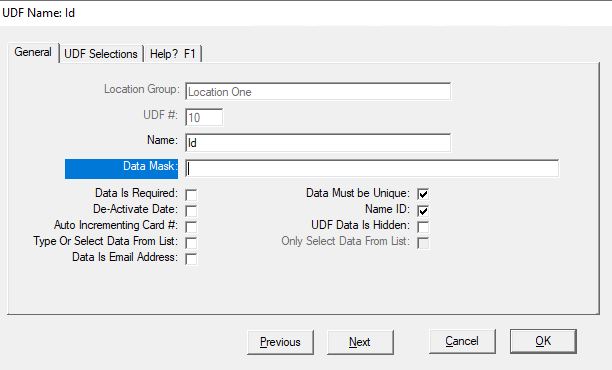
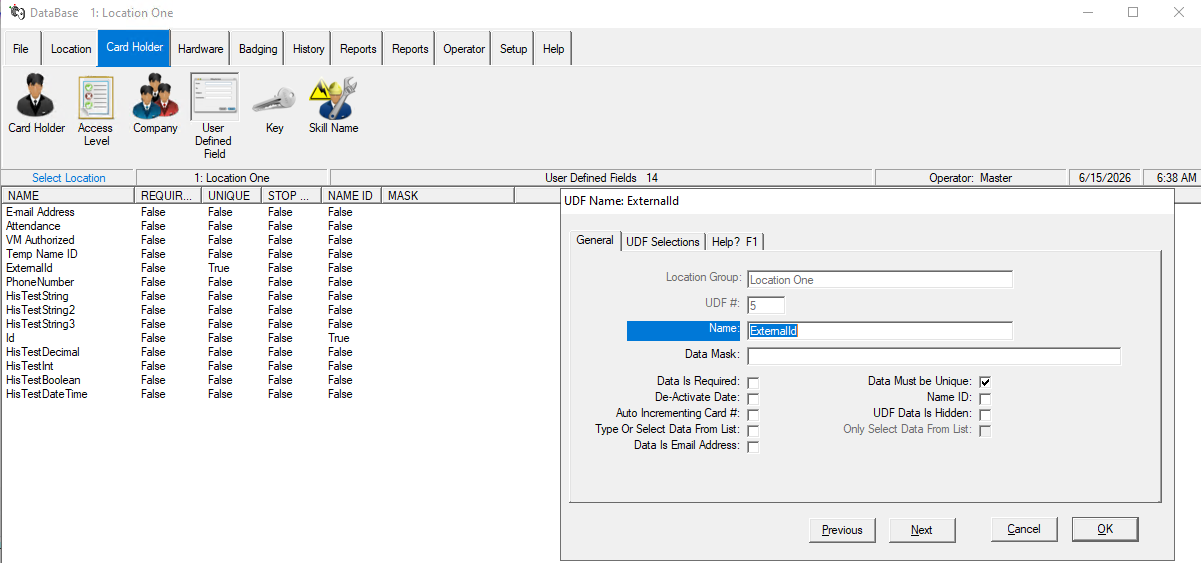
Create these extension fields below which are required by the https://hidis.atlassian.net/wiki/spaces/UD/pages/241369089/HIS+DSX+Agent#Agent-specific-configuration.
-
UDF Nameis an example how the field could named. -
Enter your used
UDF Namein the agent configuration as theAgent configuration namebelow.
-
|
Agent configuration name |
UDF Name |
UDF options |
|---|---|---|
|
|
|
|
|
|
|
|
|
|
|
- |
|
|
|
- |
Agent Configuration
General agent startup
{pacs-name} = dsx-access-systems_dsx
Step 1: Download
To obtain the pacs-agent_{pacs-name} Docker image, follow the HID Agent Administration Guide for End-Customer.
Step 2: Create environment
Create a file named .env with the following content:
Agent__TenantId=example-tenant-id
Agent__PacsId=example-pacs-id
Auth__ClientId=your-client-id
Auth__ClientSecret=your-client-secret
In case you are connecting to a different environment than HID production, you need to set the proper URLs:
Auth__AuthNProvider=https://auth.example.com
Agent__PlatformUrl=https://platform.example.com
-
Adjust all file parameters according to your setup.
-
It is recommended to store this configuration on an encrypted drive or delete
.envfile as soon as the Docker image is executed.
Step 3: Run Docker image
docker run -d \
  --env-file .env \
  pacs-agent-{pacs-name}:latest
Step 4: Check that the Docker image is running
docker ps
Environment variables description
Related to HIS
-
Agent__PlatformUrl: HID Integration Service URL (https://his.hidglobal.com/ais/v1).-
This information is provided by HID. By default, this is set automatically to the production environment value and does not need to be set manually in most cases.
-
-
Agent__TenantId: Tenant ID within HID Integration Service.-
This information is provided by HID.
-
-
Agent__PacsId: Unique ID assigned to the agent during registration.-
This information is provided by HID.
-
If you registered your PACS on your own, this would be the
IDyou gave to the PACS.
-
Related to HID Authentication Service
-
Auth__AuthNProvider: HID Authentication Service URL (https://auth-us.api.hidglobal.com/idp/t89d23e0b2445510399335/authn).-
This information is provided by HID. By default, this is set automatically to the production environment value and does not need to be set manually in most cases.
-
-
Auth__ClientId: Client ID obtained during registration.-
This information is provided by HID.
-
-
Auth__ClientSecret: Client secret obtained during registration.-
This information is provided by HID.
-
Don't forget to replace the {pacs-name} placeholders with the actual name of the pact agent.
Agent-specific configuration
Environment variables for DSX:
-
Dsx__DbConnectionString: (Required) This is used for updating DSX data.
E.g.Data Source=DSX\\SQLExpress,1433;Persist Security Info=False;User ID=user;Password=password;Database=AcsData;Pooling=False;MultipleActiveResultSets=False;Encrypt=False;TrustServerCertificate=True;Command Timeout=0-
Please, check https://hidis.atlassian.net/wiki/spaces/UD/pages/241369089/HIS+DSX+Agent#ConnectionString-configuration for more details.
-
-
Dsx__DbLogConnectionString: (Optional) This is used for reading alarms/events.
E.g.Data Source=DSX\\SQLExpress,1433;Persist Security Info=False;User ID=user;Password=password;Database=AcsLog;Pooling=False;MultipleActiveResultSets=False;Encrypt=False;TrustServerCertificate=True;Command Timeout=0-
Please, check https://hidis.atlassian.net/wiki/spaces/UD/pages/241369089/HIS+DSX+Agent#ConnectionString-configuration for more details.
-
-
Dsx__UdfNameExternalId: Enter the name of an ExternalId User Defined Field. Please, see the https://hidis.atlassian.net/wiki/spaces/UD/pages/241369089/HIS+DSX+Agent#Creating-technical-custom-fields -
Dsx__UdfNameInternalId: Enter the name of an InternalId User Defined Field. Please, see the https://hidis.atlassian.net/wiki/spaces/UD/pages/241369089/HIS+DSX+Agent#Creating-technical-custom-fields -
Dsx__UdfNameEmail: Enter the name of an Email User Defined Field. Please, see the https://hidis.atlassian.net/wiki/spaces/UD/pages/241369089/HIS+DSX+Agent#Creating-technical-custom-fields -
Dsx__UdfNamePhoneNumber: Enter the name of an Phone Number User Defined Field. Please, see the https://hidis.atlassian.net/wiki/spaces/UD/pages/241369089/HIS+DSX+Agent#Creating-technical-custom-fields -
Dsx__DefaultCompanyName: Enter the default company name used when creating an identity or visit. You can find available companies inCard Holder/Company.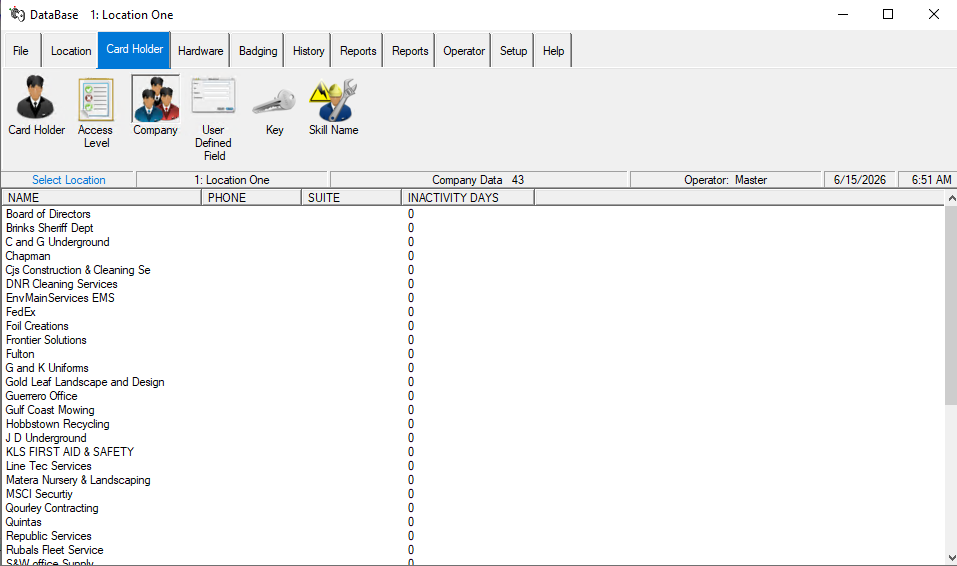
An example of how a list of companies looks -
Dsx__LocationId: ID of the location managed by this agent instance. You can find available locations inLocation/Locations. Use the value fromLOC. #.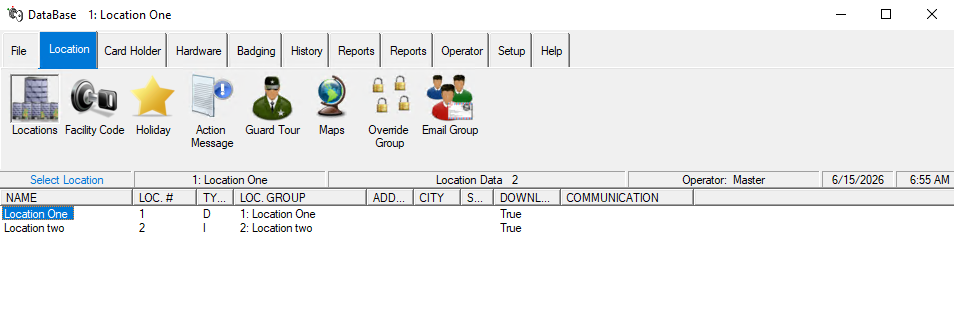
Example list of locations -
Dsx__ServerUrl: IP address OR domain of the machine where the DSX is running. -
Dsx__SambaUser: A user name of Windows user who access the machine where the DSX is running. Please, see the https://hidis.atlassian.net/wiki/spaces/UD/pages/241369089/HIS+DSX+Agent#Access-to-DSX-filesystem -
Dsx__SambaPassword: A password related withDsx__SambaUser. -
Dsx__RootFolder: (Optional - default isWinDSX) Set a folder where the DSX is installed. -
Dsx__ApiFolder: (Optional - default isAPI) Specify the DSX subfolder containing the API folder.
Please, makes sure the
\\Dsx__ServerUrl\Dsx__RootFolder\Dsx__ApiFolder exists on the DSX side and it’s reachable for the Agent for a user Dsx__SambaUser with a Dsx__SambaPassword through the Samba v2 protocol.
-
Dsx__ImagesFolder: (Optional - default isImages) Specify the DSX subfolder containing the Images folder.
Please, makes sure the
\\Dsx__ServerUrl\Dsx__RootFolder\Dsx__ImagesFolder exists on the DSX side and it’s reachable for the Agent for a user Dsx__SambaUser with a Dsx__SambaPassword through the Samba v2 protocol.
-
Dsx__MaxCardCode: (Optional - default is 16,777,214) Maximum card code DSX can save. -
Dsx__TechnicalCardCodeRangeFrom: (Optional - default is 16,000,000) -
Dsx__TechnicalCardCodeRangeTo: (Optional - default is 16,777,214)
Defines the card code range reserved for internal technical cards. Must satisfyRangeFrom<RangeTo≤MaxCardCode, and the entire range must not overlap with real credential card codes in use. The range capacity (RangeTo − RangeFrom) must be at least as large as the total number of cardholders in the system. -
Dsx__TechnicalCardNotes: (Optional - default isHIS Technical Card) The value written to the Notes field of every technical card. Used to distinguish technical cards from credential cards. Must be unique — no real credential card should ever carry this exact Notes value. -
Dsx__EventBatchSize: (Optional - default is 100) Events are read in batches, representing the maximum number of events per batch. -
Dsx__EventPollingIntervalMs: (Optional - default is 5000) Specifies the polling frequency of a batch in milliseconds. -
Dsx__ApiDelayBetweenAttemptsInMilliseconds(Optional - default is 500) Polling interval in milliseconds used to check whether the API file has been picked up by DSX. -
Dsx__DbWaitStepSeconds(Optional - default is 10) Initial DB wait time after the API file disappears. Each retry cycle adds this amount to the wait.
E.g. cycle 1 waits 10 s, cycle 2 waits 20 s, cycle 3 waits 30 s, … -
Dsx__TotalTimeoutSeconds(Optional - default is 120) Hard ceiling on the total time spent writing one DSX operation (file disappear + DB confirmation + retries).
Agent-specific .env file part example:
Dsx__DbConnectionString=<db-connection-string>
Dsx__DbLogConnectionString=<db-log-connection-string>
Dsx__UdfNameInternalId=<internal-id-udf-name>
Dsx__UdfNameExternalId=<external-id-udf-name>
Dsx__UdfNameEmail=<email-udf-name>
Dsx__UdfNamePhoneNumber=<phone-number-udf-name>
Dsx__DefaultCompanyName=<company-name>
Dsx__LocationId=<location-id>
Dsx__ServerUrl=<IP-or-domain>
Dsx__SambaUser=<samba-username>
Dsx__SambaPassword=<samba-password>
Dsx__RootFolder=WinDSX
Dsx__ApiFolder=API
Dsx__ImagesFolder=Images
Dsx__MaxCardCode=16777214
Dsx__TechnicalCardCodeRangeFrom=16000000
Dsx__TechnicalCardCodeRangeTo=16777214
Dsx__TechnicalCardNotes=His Technical Card
Dsx__EventBatchSize=100
Dsx__EventPollingIntervalMs=5000
Dsx__ApiDelayBetweenAttemptsInMilliseconds=500
Dsx__DbWaitStepSeconds=10
Dsx__TotalTimeoutSeconds=120
ConnectionString configuration
E.g. Data Source=DSX\\SQLExpress,1433;Persist Security Info=False;User ID=user;Password=password;Database=AcsLog;Pooling=False;MultipleActiveResultSets=False;Encrypt=False;TrustServerCertificate=True;Command Timeout=0
-
Replace
DSX\\SQLExpressby URL of the database server. -
userandpasswordby a user with read and write rights to the DSX database. -
Database=AcsDatashould be included.-
Use database where DSX data are used - e.g.
AcsData -
Use database where DSX logs are used - e.g.
AcsLog- Optional, used for reading alarms/events)
-
Limitations
-
Each identity/visitor internally uses one technical card (hidden from the API) for ACL management. Technical card codes default to the range 16,000,000–16,777,214 (configurable via the agent configuration).
-
If all codes in the configured technical card range are exhausted, import/create will fail.
-
When the agent sends a change to DSX, it writes a file and checks every
Dsx__ApiDelayBetweenAttemptsInMillisecondsmilliseconds whether DSX has picked it up and the database reflects the change. If the database does not confirm in time, the agent retries — each retry allows progressively more time for the database, increasing byDsx__DbWaitStepSecondsseconds per cycle (10 s, then 20 s, then 30 s, …). The operation fails with an error if the total time across all retries exceedsDsx__TotalTimeoutSecondsseconds. Once exceeded, aDsxWriteFailedExceptionorDsxFileNotProcessedExceptionis thrown.
Unsupported operations
-
All PIN first-factor operations for identities and visits
-
IdentityActivate - Identities are always Active.
-
IdentityDeactivate
-
IdentityCredentialActivate,
-
IdentityCredentialDeactivate
-
IdentityPin
-
VisitCheckIn - Visitors are always Active.
-
VisitCheckOut
-
VisitCredentialActivate
-
VisitCredentialDeactivate
-
VisitPin
-
Events Writing to the PACS
Limited operation
|
Operation |
Note |
|---|---|
|
|
Identity/Visitor Read picture is available. |
|
|
Filtering identities/visitors by |
|
|
The import operation often fails due to unreliable DSX PACS request handling. We do not recommend using this operation at this time. |
Naming Mapping
Entities
|
AIS Entity Name |
PACS GUI Term |
|---|---|
|
Identity |
Card holder (a visitor bool flag: false) |
|
Visit |
Card holder (a visitor bool flag: true) |
|
Card Format |
N/A - card uses card number only. |
|
Identity Credential |
Card |
|
Visit Credential |
Card |
|
Access Unit |
Access Level |
|
Identity Access |
Access Level |
|
Visit Access |
Access Level |
|
Extension field |
UDF (User Defined Field) |
Operations
N/A
Creation of extension fields
Supported entities and data types
List of Entities Supporting Extension Fields (Relevant to AIS)
|
Entity |
Supports EFs |
|---|---|
|
Identity |
Yes |
|
Visit |
Yes |
|
Credential |
Yes |
List of Supported Data Types for Extension Fields
|
Variable type (AIS) |
Variable type (PACS) |
|---|---|
|
Boolean |
Emulated via String |
|
Integer |
Emulated via String |
|
Decimal |
Emulated via String |
|
String |
String |
|
DateTime |
Emulated via String |
Manual for Creating an EF in the PACS
-
Go to the DSX GUI.
-
Click on “Card Holder” Tab.
-
Click on the “User Defined Field” button.
-
Right-click the mouse button to an existing UDF and select “Add”.
-
Fill the name + other settings – depending on what you need.
-
Click on the Ok button.