
Prerequisites
-
Gallagher Command Center installed and operational
-
API version: 9.30
Configuration
PACS Configuration
Create the Default Access Group
-
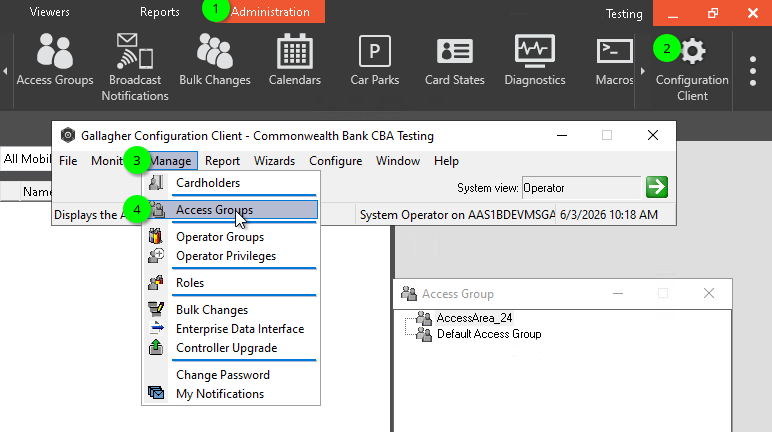
Open the Configuration client (e.g. navigate to Administration > Configuration Client).
-
Click on Manage > Access Groups.
-
The Access Group List Window opens (in tree view as shown in below screen).
-
-
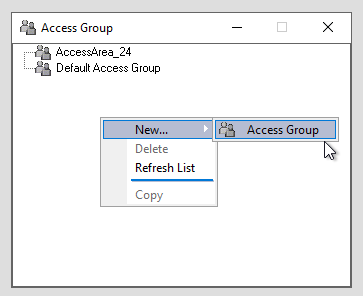
Right click on inside the widow and select New → Access Group.
-
By default the General tab displays.
-
Add Default Access Group as Name in general tab.
-
Click the Apply button, and the Access Group is created.
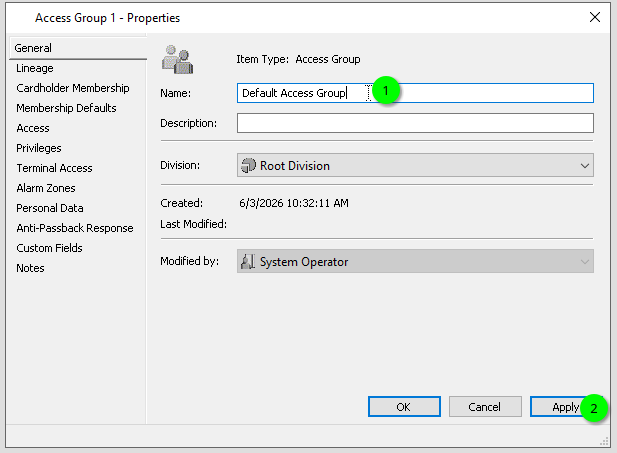
New Access Group > General > Name
-
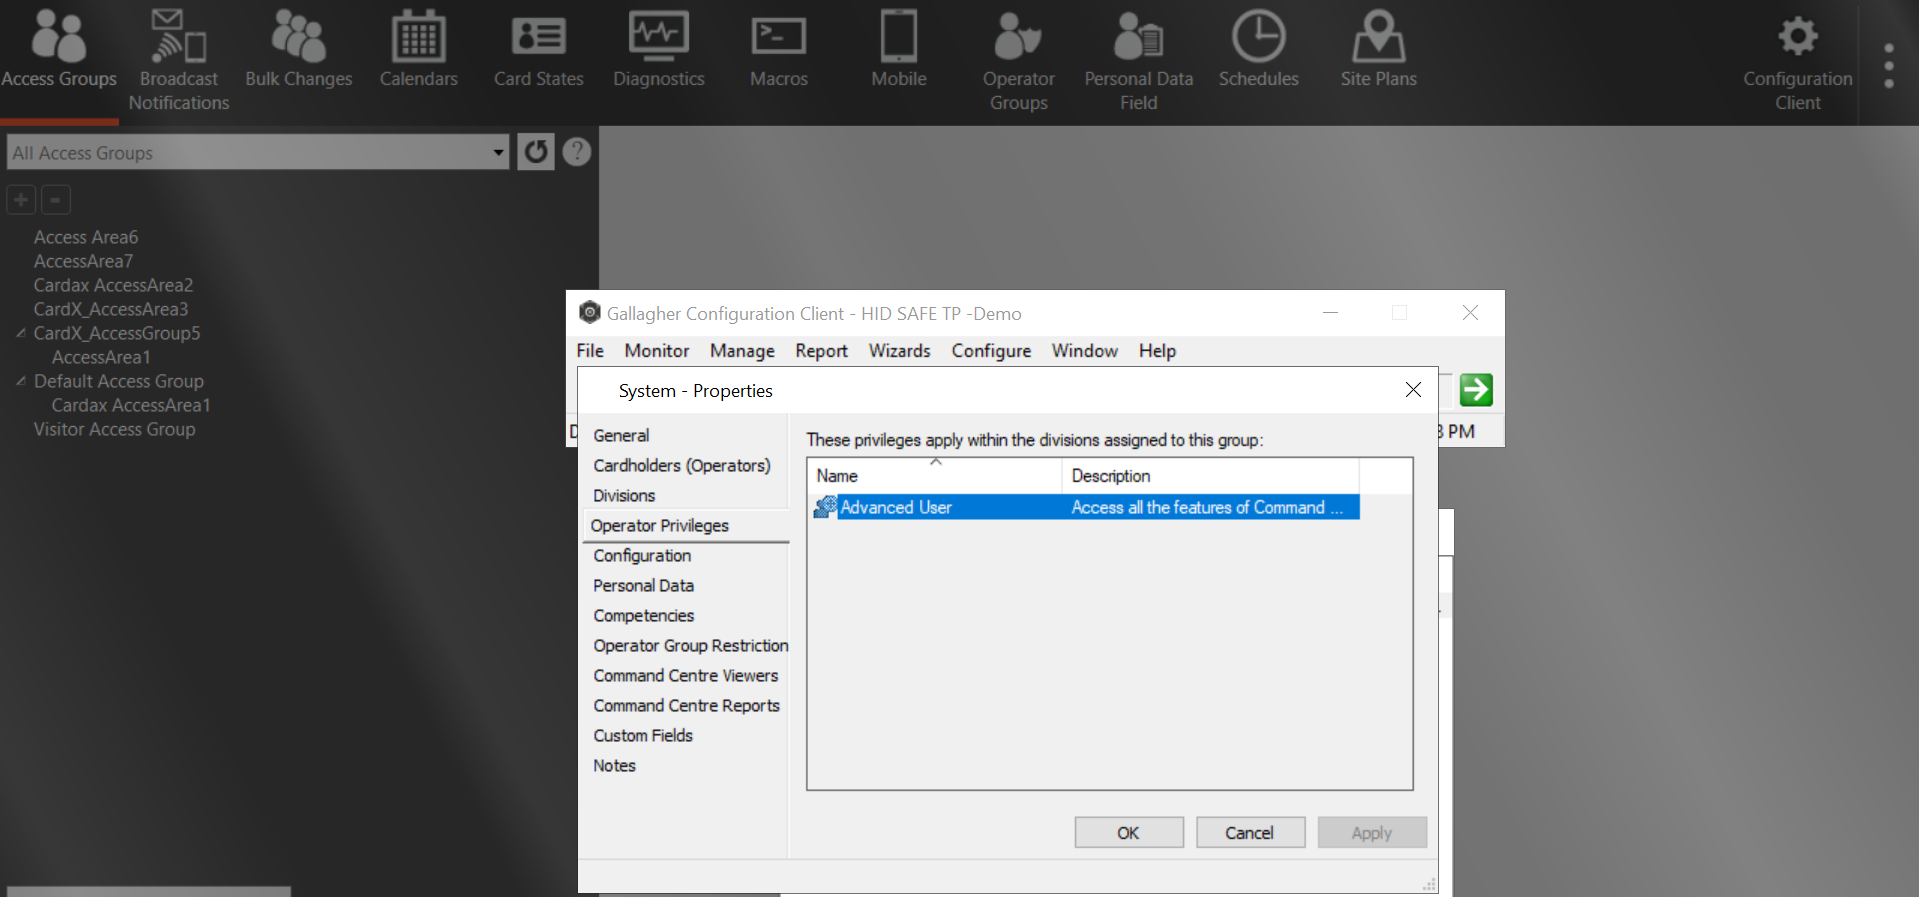
Assign privilege to Operator group
-
Open the Configuration Client.
-
Click on Manage > Operator Groups.
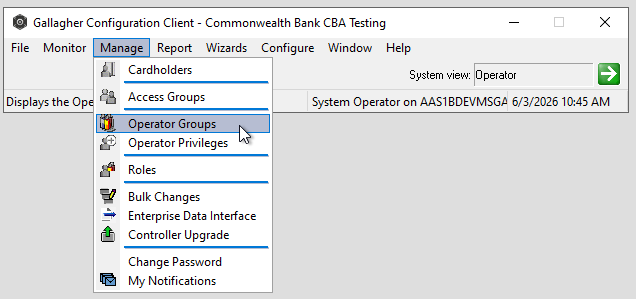
Navigate to Operator Groups -
Assign Advanced user privilege to Operator group.
-
Restart the command center service.
Add Required Person Data Fields
-
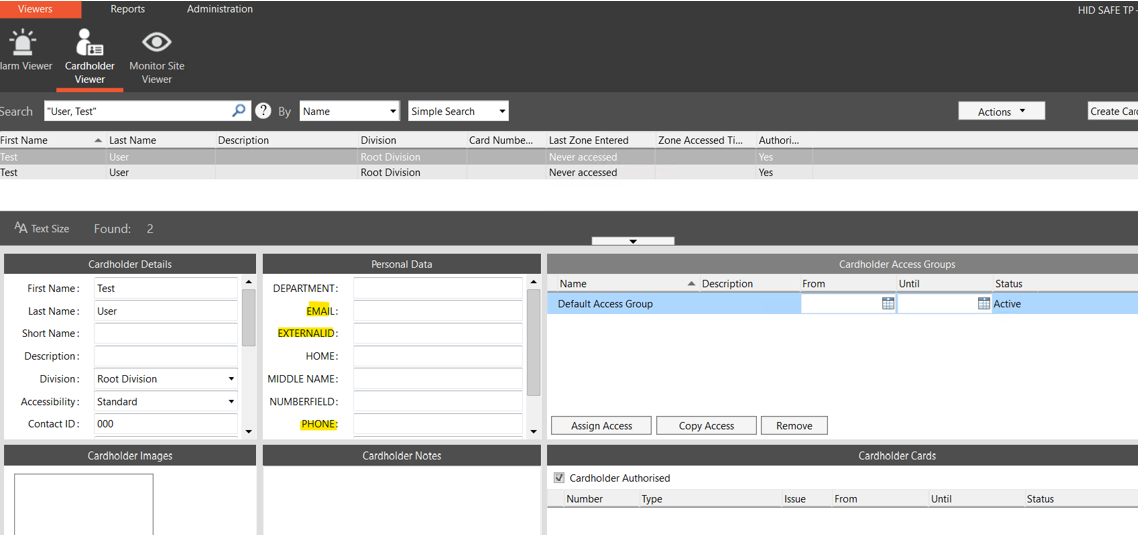
The Agent requires several custom fields to be defined on the Cardholder. Since these fields cannot be created via the API, the HID Authentication Service cannot configure them automatically – you will need to set them up manually within the Gallagher.
-
The following custom fields need to be created:
-
EXTERNALID, ofData Type= Text,Required FieldandUnique Valueboth checked -
EMAIL, ofData Type=Email -
PHONE, ofData Type=Phone -
IMAGE, ofData Type=Image
-
-
Please, check the Creation of extension field section to read how to create a new extension field.
Configure API connection
-
Open the Configuration Client.
-
Click on Configuration > Services & Workstations.
-
Open the REST Client item.
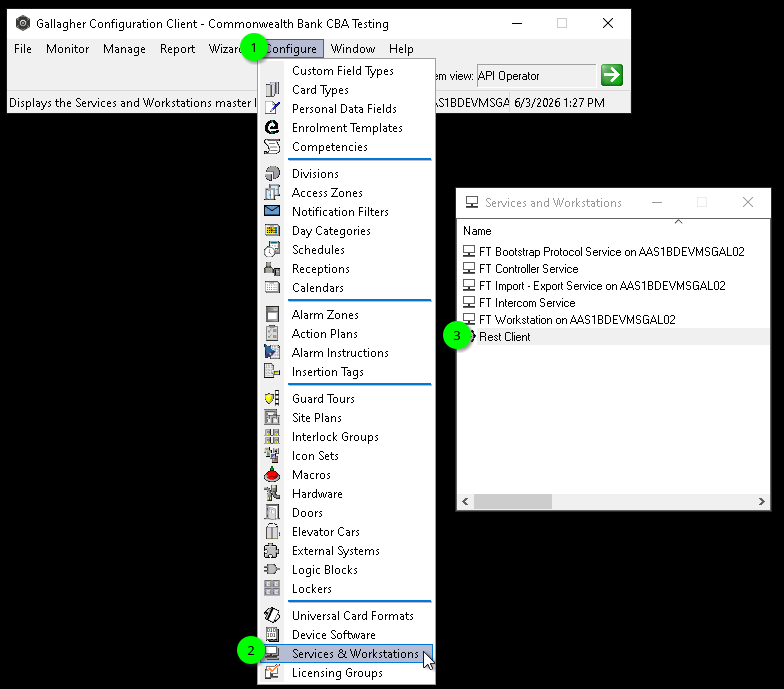
Navigate to REST Client properties -
Navigate to API Key.
-
The agent does not support using Client Certificates, so make sure the field for Client Certificate Thumbprint is empty.
-
Copy the API Key, you’ll need it for use it in agent's configuration.
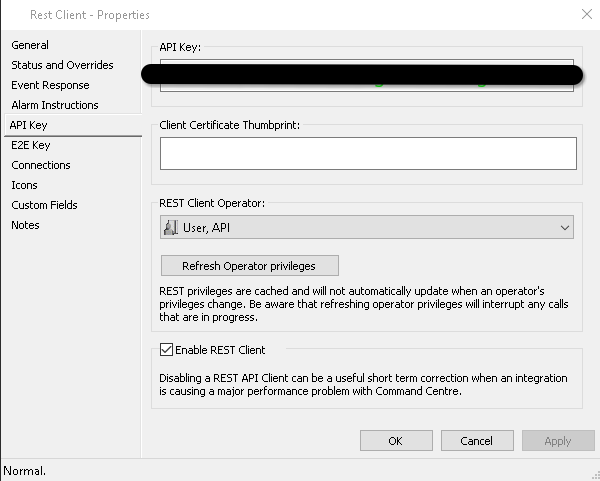
API Key section in Rest Client properties
Agent Configuration
General agent startup
Agent-specific configuration
{pacs-name} = pacs-agent_gallagher_command-centre
Environment variables for Gallagher:
-
Gallagher__BaseUrl: Gallagher BaseURL.
The default port for Gallagher is8904, but it can be changed. -
Gallagher__ApiKey: Gallagher API key.
This value should be provided with your Gallagher license.
Agent-specific .env file part example:
Gallagher__BaseUrl=https://localhost:8904
Gallagher__ApiKey=ApiKey
Limitations
General limitations
-
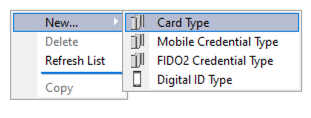
Only “Card type“ Gallagher card types are supported as HIS card formats.
-
Credential Date Enforcement: Whether
From DateandUntil Dateare required depends on the credential format configuration in the Gallagher Command Centre GUI.-
The
Get Credential FormatsAPI endpoint does not expose this requirement. -
If enforced in the PACS GUI, credential creation will fail with error ("From Date And Until Date are Mandatory") unless these values are provided.
-
To support these formats, the tenant must map
$.self.fromand$.self.untilto credential extension fields and supply the appropriate values during creation.
-
-
Future-Dated Activation: If a credential's
From Dateis in the future, attempting to activate it via AIS will return a200 OKstatus, but the credential will remainInactive. This mirrors the Gallagher GUI behavior where the state change is silently ignored until the date becomes effective. -
View PIN Limitation for AIS-Provisioned Credentials: The PACS View PIN feature (enabled via
Configuration Client>File>Server Properties>Card Security>Store user PINs for later viewing) allows retrieval of PINs set through the PACS UI.PINs written to
$.self.pinvia AIS do not populate the PACS PIN store and therefore cannot be viewed using this feature.
When updating photos, it is preferable to use jpeg format, although the system also accepts png format.
Unsupported Operations
-
Visitor-related endpoints (PACS doesn’t support native Visitors)
-
PIN-Credential endpoints:
-
CreatePin(Identity / Visit) -
GetPin(Identity / Visit) -
UpdatePin(Identity / Visit) -
RemovePin(Identity / Visit) -
ActivatePin(Identity / Visit) -
DeactivatePin(Identity / Visit)
-
-
Events Writing to the PACS
Limited Operations
-
While creating the credential the maximum supported Deactivation date is
|
Operation |
Note |
|---|---|
|
Create Credential |
|
|
Update Credential |
Max Supported Deactivation Date is |
|
Activate Credential |
Activation is silently ignored if the |
Naming Mapping
Entities
|
AIS Entity Name |
PACS GUI Term |
|---|---|
|
Identity |
Cardholder |
|
Credential |
Card |
|
Card Format |
Card Type |
|
Access Unit |
Access Group |
|
Format |
Card type of type “Card type” |
Creation of Extension Fields
Manual for Creating an EF in the PACS
-
Gallagher supports extension fields, but they must be created manually using the Personal Data Field (PDF).
-
Person Data Fields (PDF)
-
The Agent requires several custom fields to be defined on the Cardholder. Since these fields cannot be created via the API, the HID Authentication Service cannot configure them automatically – you will need to set them up manually within the Gallagher.
-
You'll need to launch the Gallagher Command Center/Gallagher Configuration Client application, which should be included with the Gallagher installation. This tool allows you to add personal data fields to specific entities such as Cardholders.
-
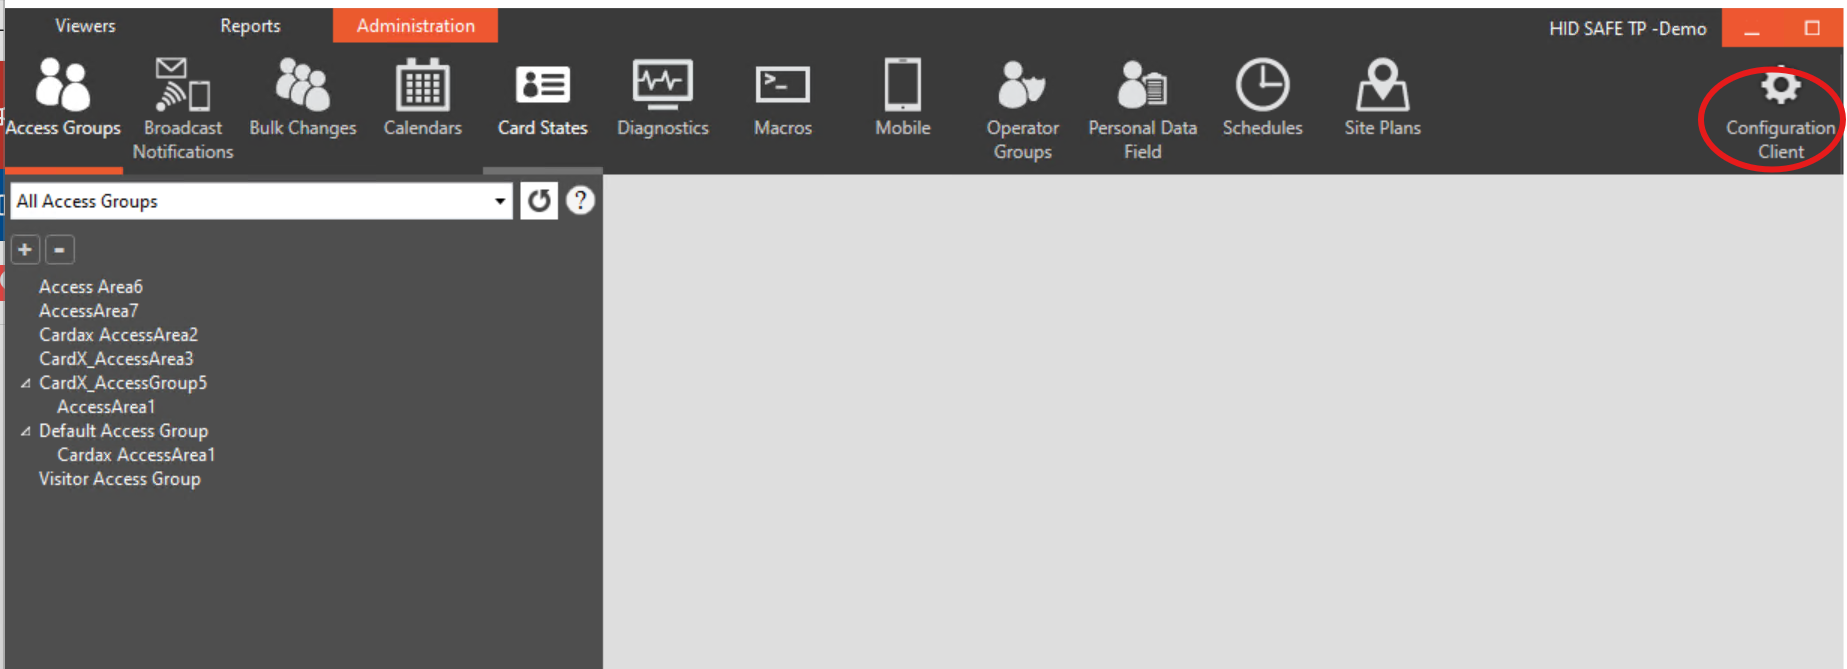
After logging in, you should see the main screen with menu. Click on Configuration Client on the right.
-
-
-
You're now on the page where you can define custom fields for the Cardholder entity. Let's start by adding the EXTERNALID personal data field:
-
-
-
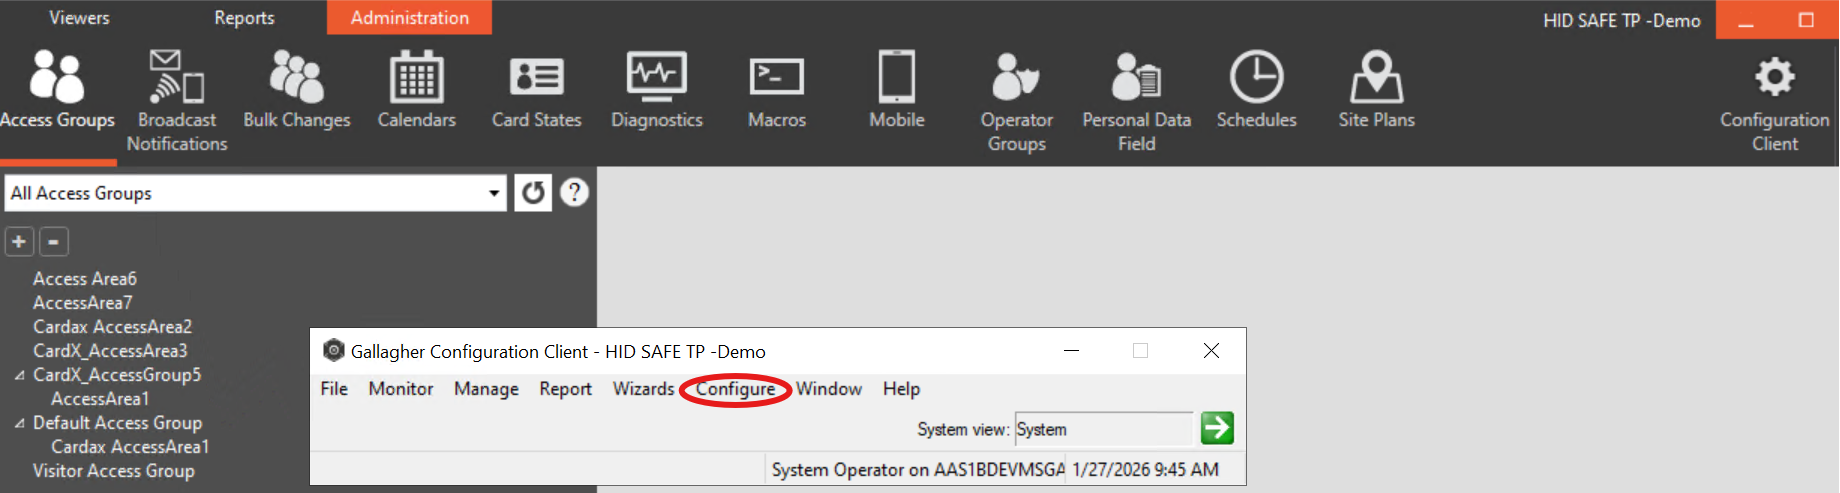
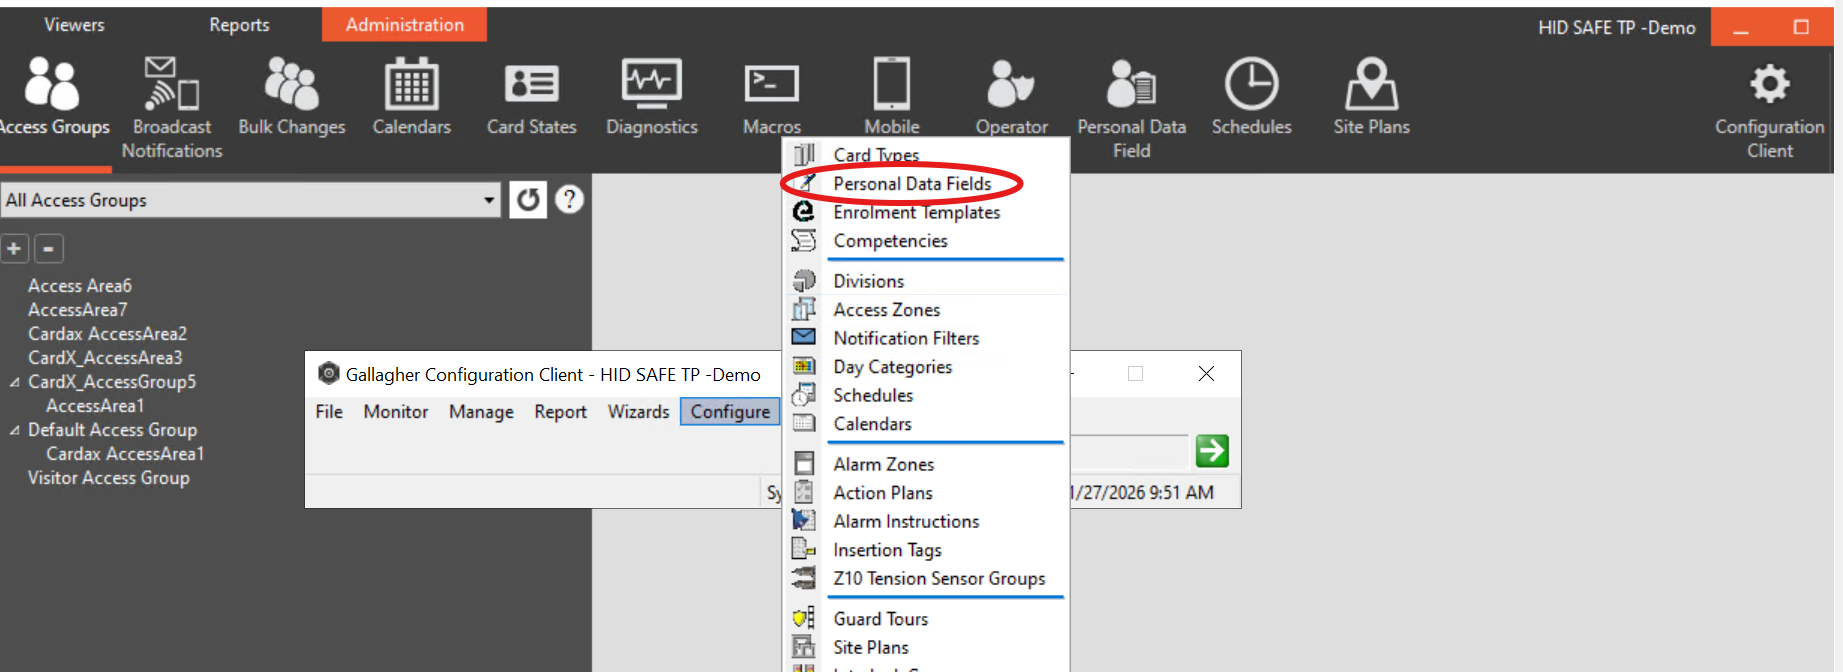
Click Configure from the menu bar, then Personal Data Fields. The Personal Data Field List Window opens (in grid view).
-
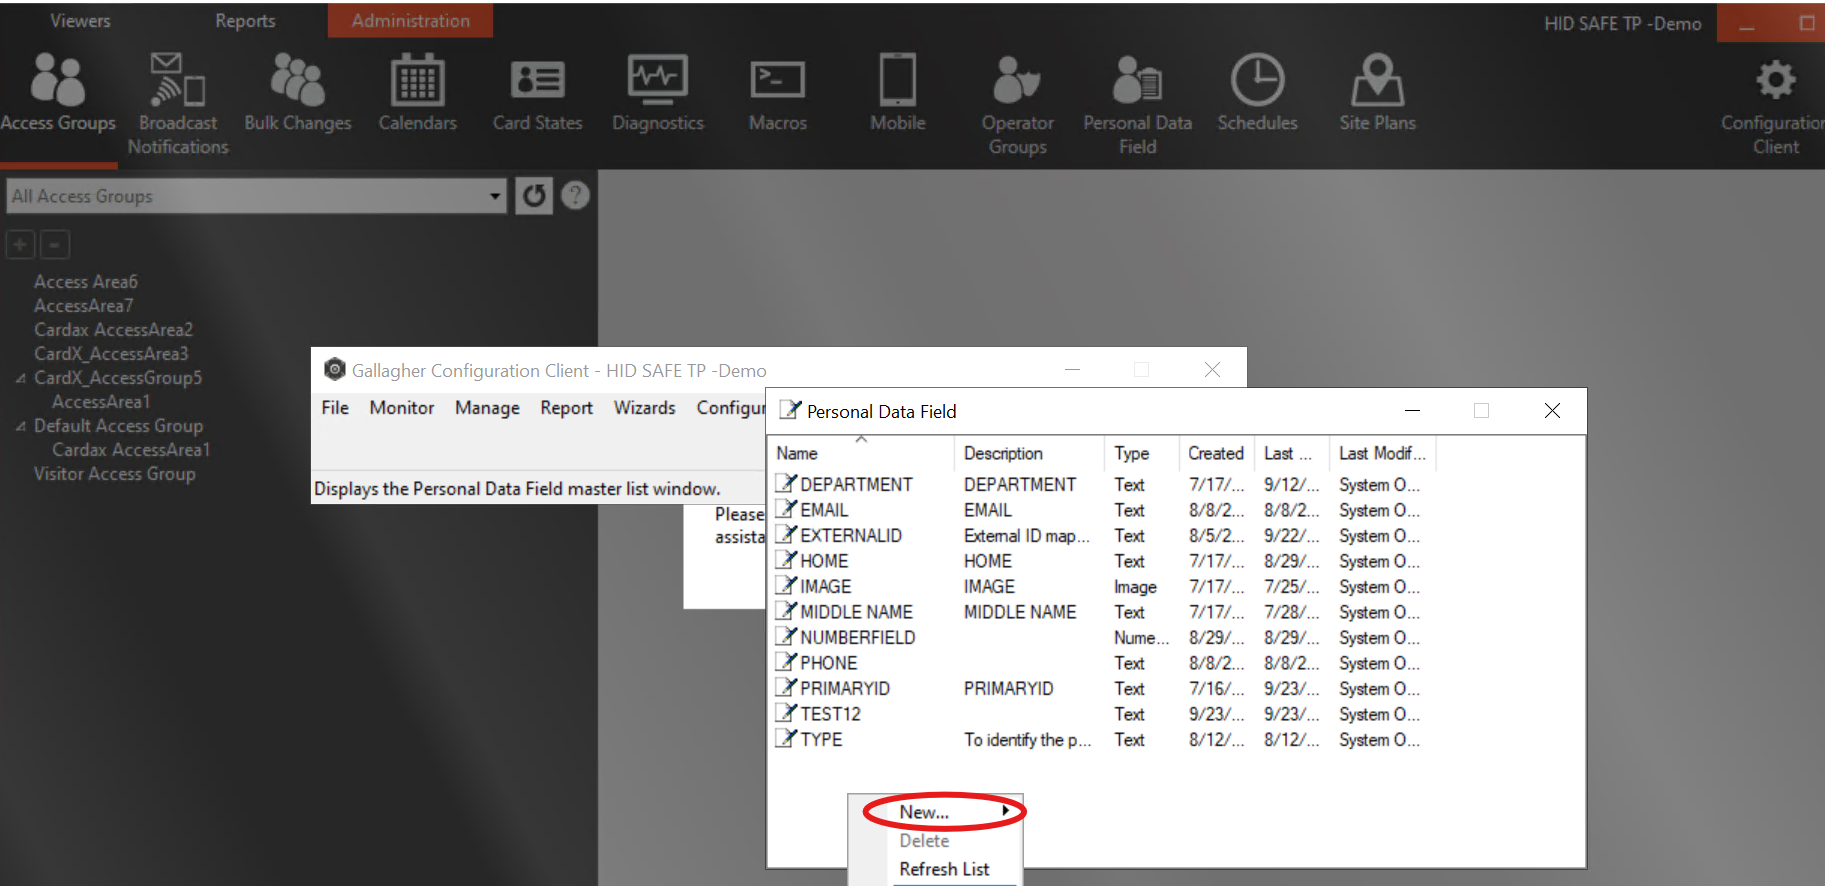
Right click and select New...Personal Data Field.
-
By default, the General tab displays.
-
-
Add Name as EXTERNALID.
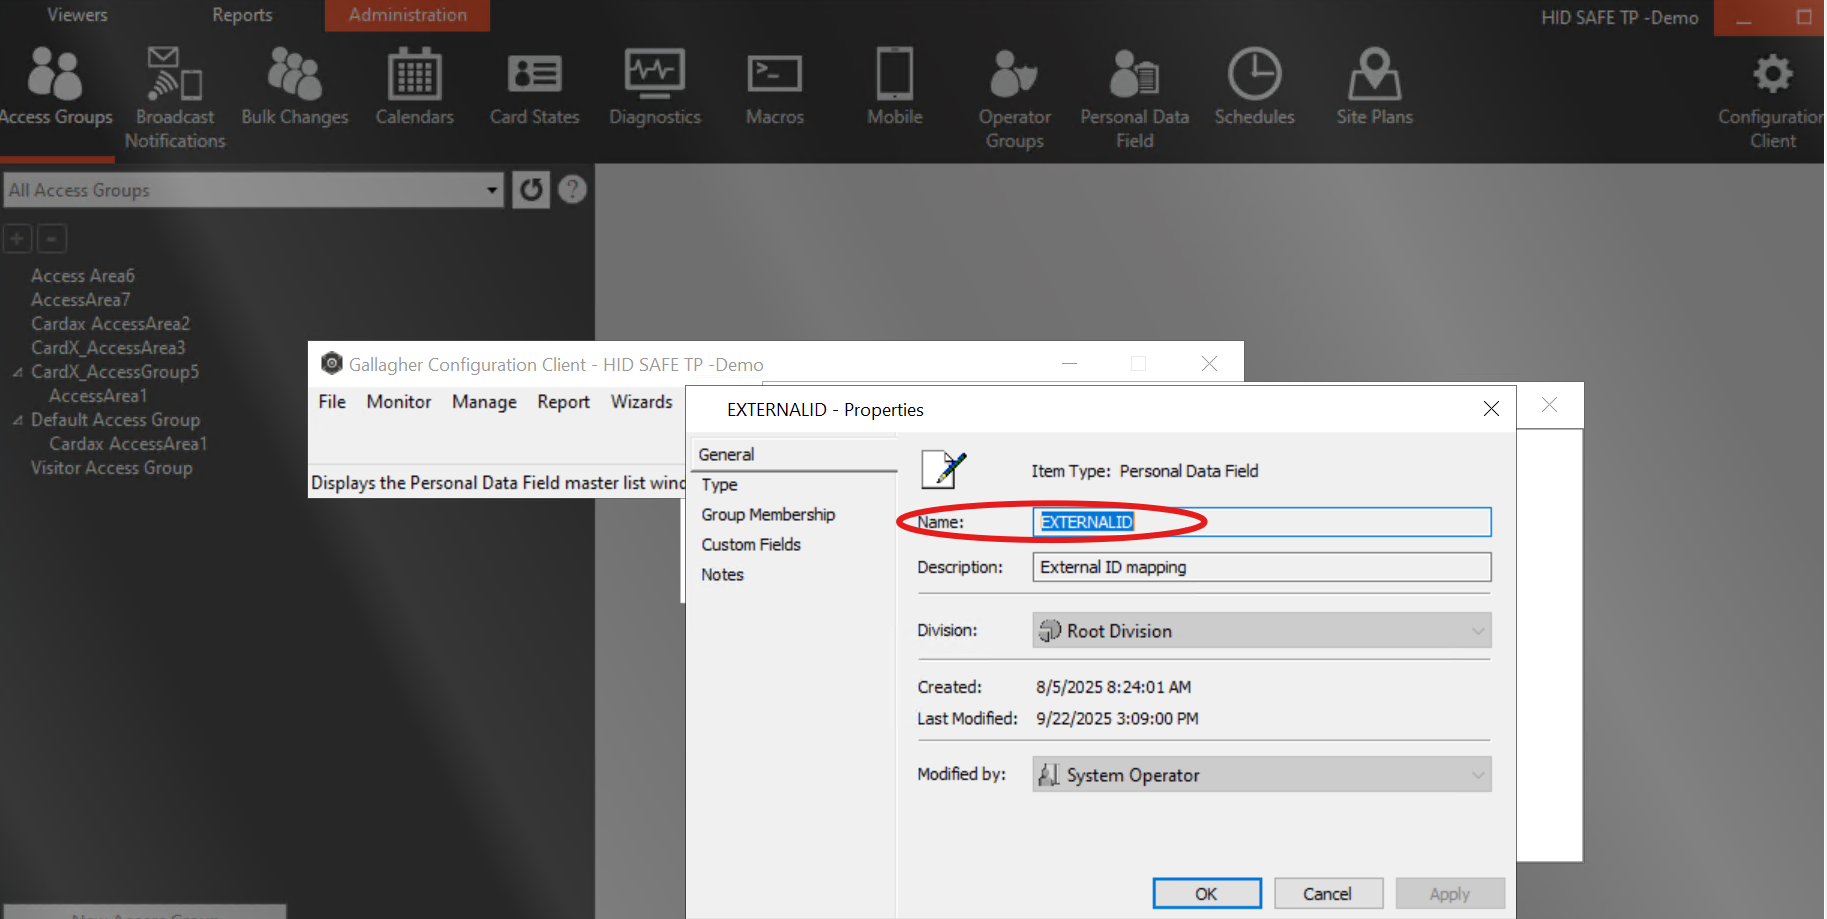
-
Click each tab in turn to configure a Personal Data Field:
-
Click the Type tab.
-
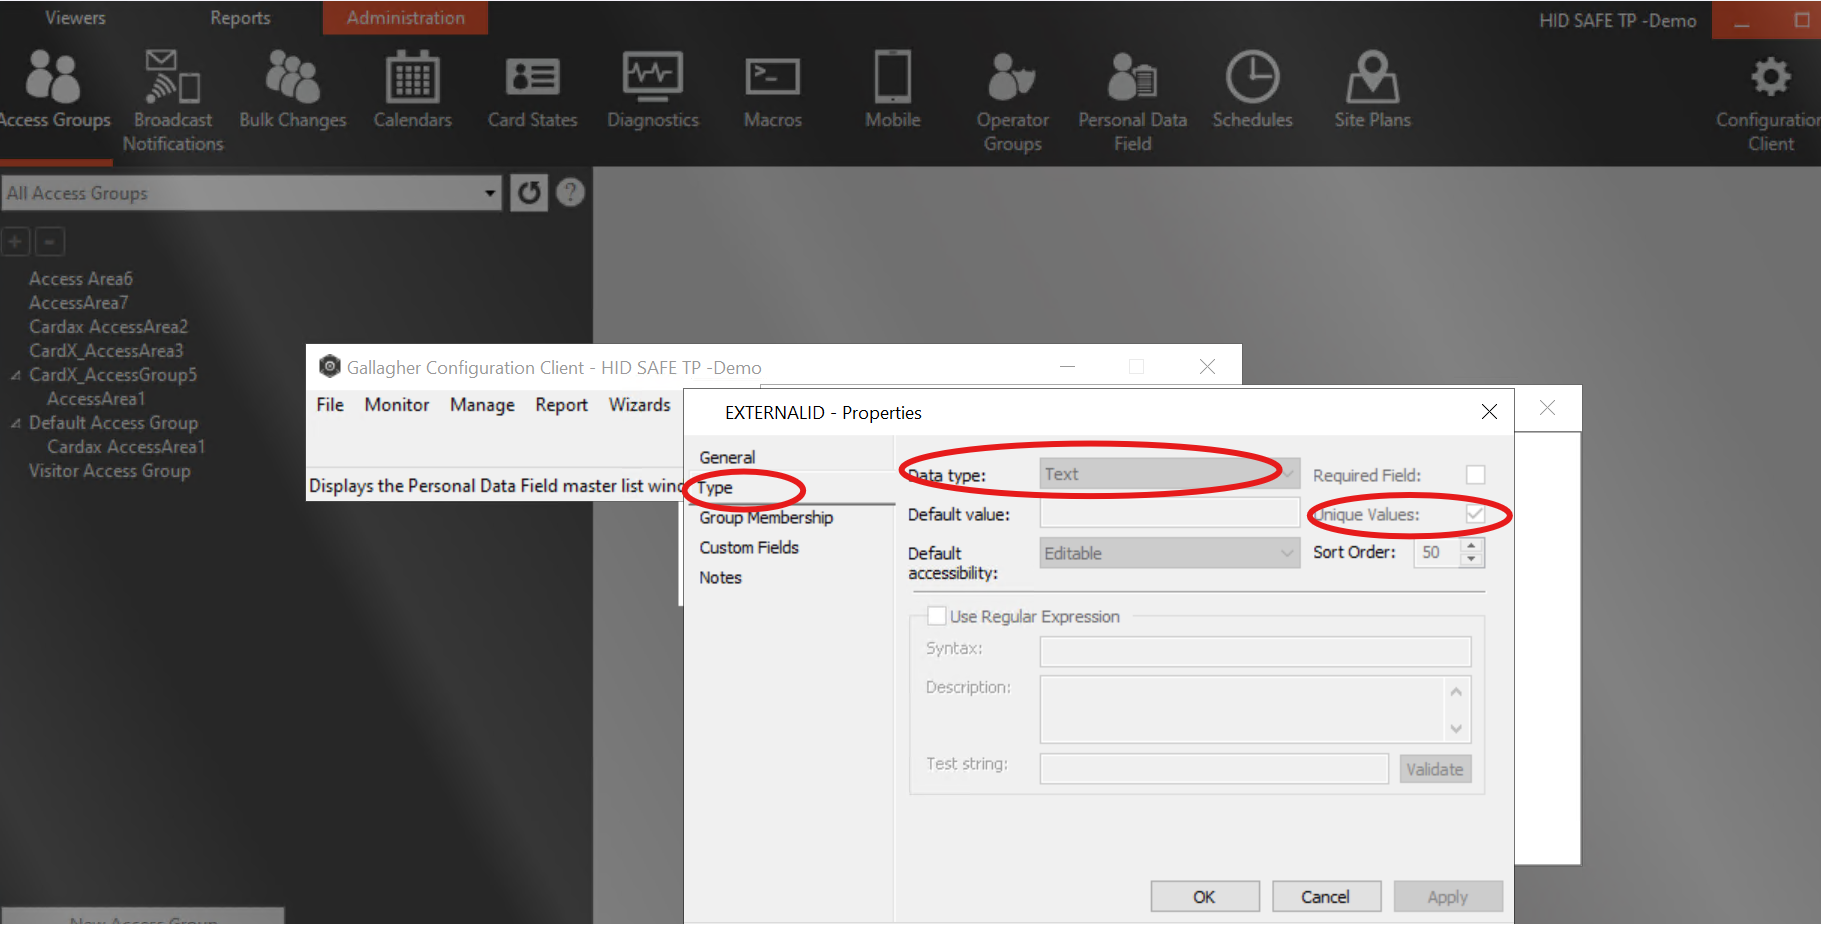
-
Select "Text" as the Data Type field. Tick the checkboxes Unique values and Required Field.
-
Click the Group Membership tab.
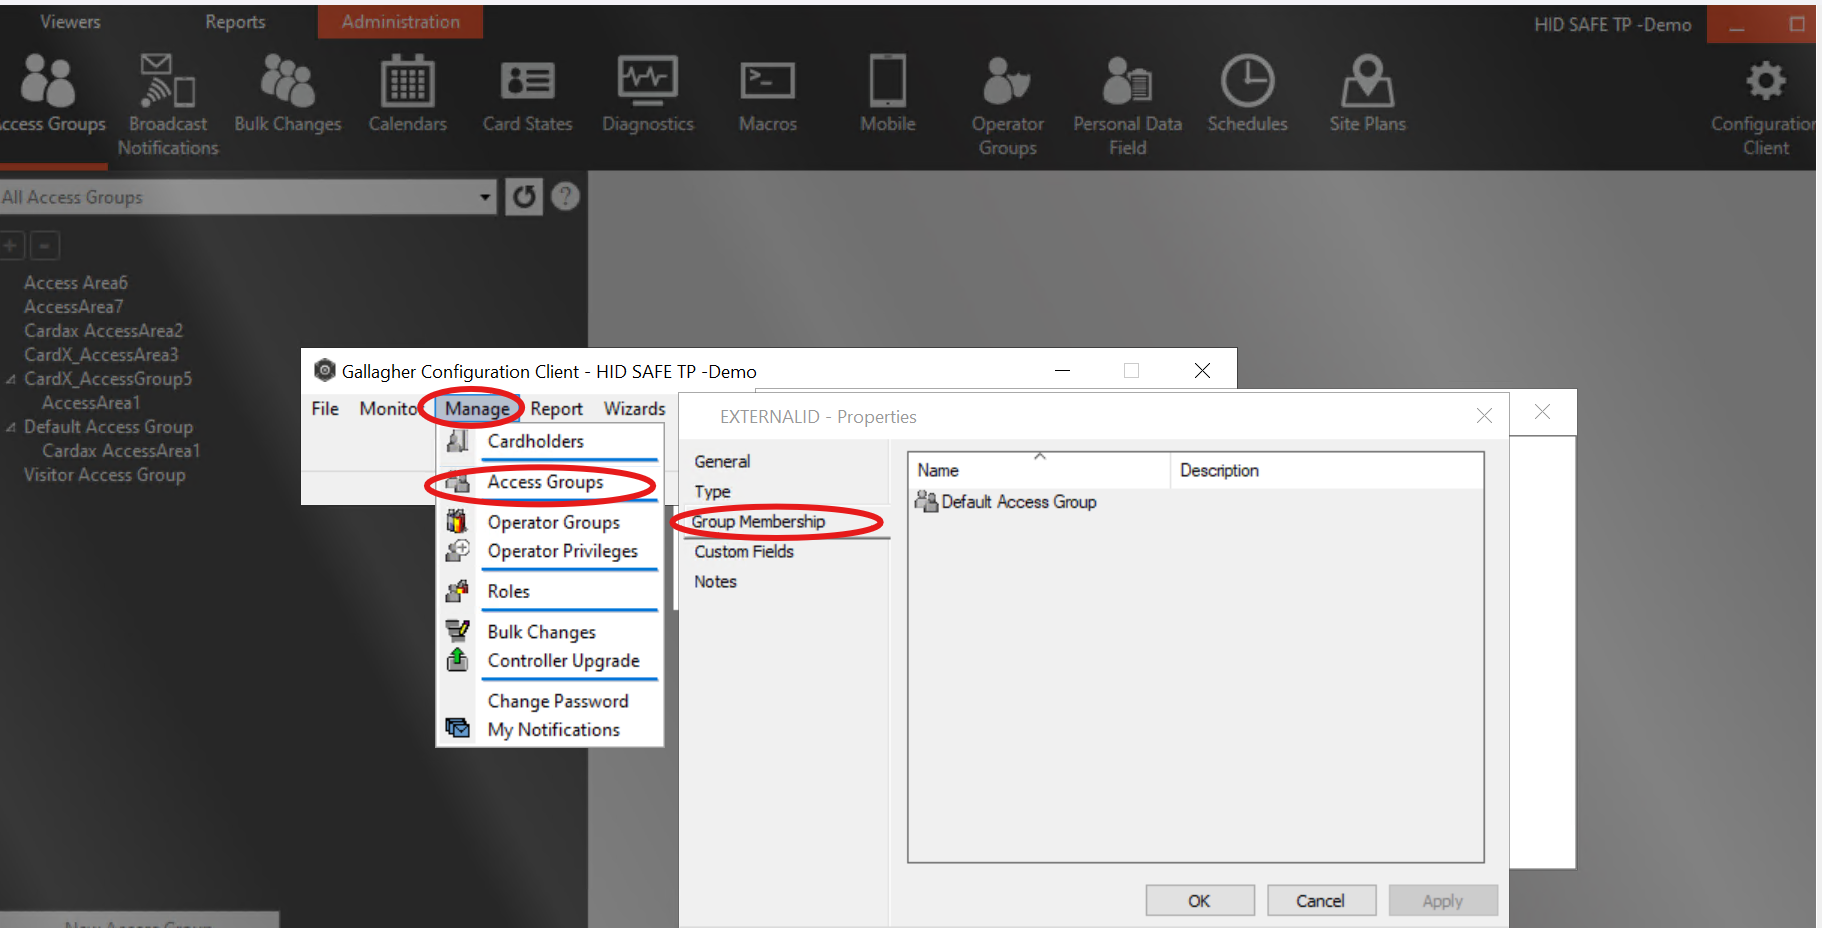
-
Go to Manage from the main menu bar, then Access Groups.
-
The Access Group List Window opens.
-
Select the Default Access Group for this Personal Data Field, that has created in the “create default access group” step.
-
Drag and drop them into the Group Membership tab
-
-
-
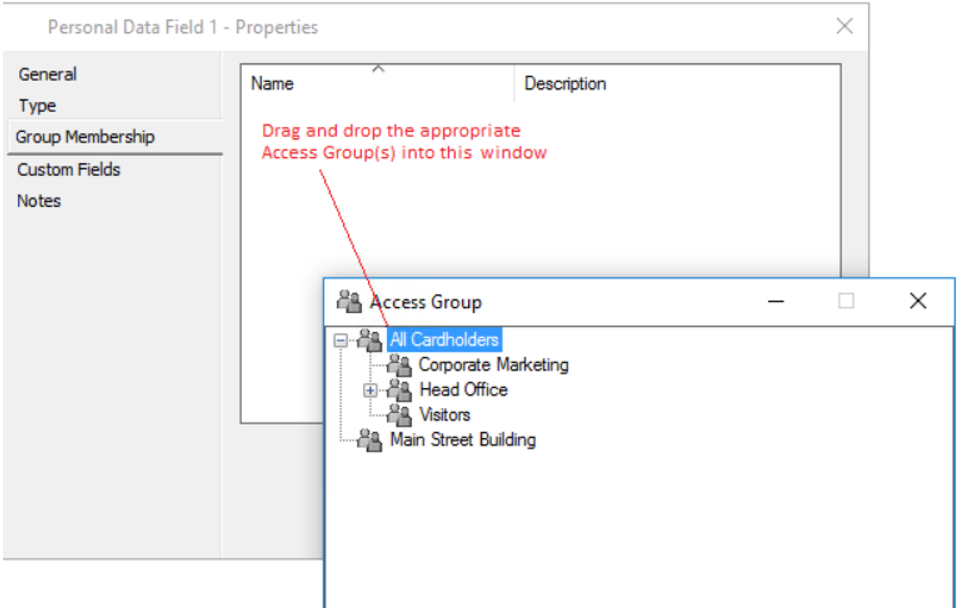
-
Click OK to exit and save your changes.
-
Repeat above steps for adding EMAIL, PHONE, IMAGE person data fields (each with its respective Data Type).
-
Once added, these PDF fields become available for use on Cardholders by the Agent.
Supported entities and data types
List of Entities Supporting Extension Fields (Relevant to AIS)
|
Entity |
Supports EFs |
|---|---|
|
Identity |
Yes |
|
Credential |
No |
|
Access Unit |
No |
List of Supported Data Types for Extension Fields
|
Data type (AIS) |
Data type (PACS) |
|---|---|
|
Boolean |
Emulated via TEXT |
|
Integer |
Numeric |
|
Decimal |
Emulated via TEXT |
|
String |
TEXT |
|
DateTime |
Date (PDFs only contain a date, not a time) |